Today, as I browsed the entries for the reMarkable app in Wine’s AppDB, I noticed a “Gold” entry for Wine 10.0, which obviously sparked my attention. The important thing mentioned there is that the following workaround needs to be applied: WINEDLLOVERRIDES="qnetworklistmanager=b". In practice this means the following: if you want to start the reMarkable app from the commandline, you can do it like this:
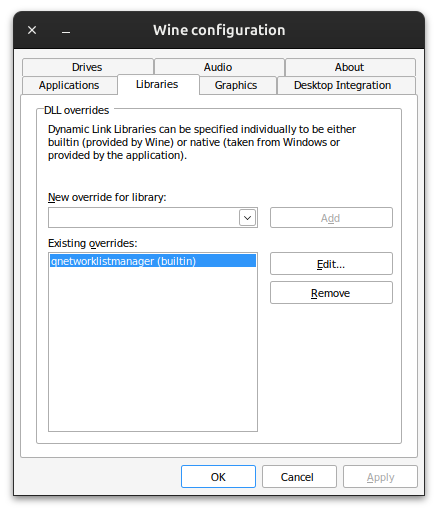
However, I prefer to launch it from the regular Gnome menu, in which case I need to add this DLL override to the wine configuration. To do that, run
WINEPREFIX="/home/lennart/reMarkable"\
winecfg
and select the Libraries tab. Add a new override for qnetworklistmanager and set it to builtin, as shown in the screenshot below. After that, launching the reMarkable app works as it always did.
Back in January 2021 I ordered the reMarkable 2 e-paper note-taking “tablet”. I use it for two things: making notes and reading and annotating PDFs. Especially the note taking has changed significantly my working environment: no more stacks of paper notes lying all over my desk. No more trying to find a certain note in a notebook or on a piece of paper.
I do miss using my fountain pen, but the advantages, including having all your notes with you on your phone outweighs this. And, although the remarkable itself runs Linux, there is no Linux version of the desktop app. Unfortunately.
For some time I used community-developed tools, mainly to up- and download PDFs to and from the device. However, as the reMarkable software and file format evolved, more and more things stopped working, so I had to shift to another solution. I managed to install the Windows application in Wine. This works well and also allows me to e.g. share my reMarkable screen in video calls.
A few weeks ago, however, the app failed to start. I wasn’t sure if this was due to an update of the remarkable app itself or because the Wine version in Ubuntu 24.04 was upgraded from version 9.22 to 10.0rc2. It turned out to be the latter because my laptop definitely had an older (previously known good) version of the app that hadn’t been updated. Updating the Wine winehq-devel package, however, broke the app (a bug has been reported, see the list of links below).
Now, as you may have noted above, I was using the winehq-devel package, so I thought it was as simple as switching to the winehq-stable package. Unfortunately, that package is not available in Ubuntu 24.04. While looking for deb packages I found that the Wine HQ repo contained older package versions. So I decided to use the package pinning functionality of the Apt packaging system. I created the file /etc/apt/preferences.d/wine with the following contents:
Package: winehq-devel
Pin: version 9.*
Pin-Priority: 1000

Package: wine-devel
Pin: version 9.*
Pin-Priority: 1000

Package: wine-devel-amd64
Pin: version 9.*
Pin-Priority: 1000

Package: wine-devel-i386:i386
Pin: version 9.*
Pin-Priority: 1000
I determined the required package names by starting with the first one and then kept trying to install the winehq-devel package until it actually finished successfully. I set the pin priority to 1000, which means “causes a version to be installed even if this constitutes a downgrade of the package”, according to the apt_preferences man page. And, indeed, that is what Apt proposes:
The following additional packages will be installed:
  wine-devel wine-devel-amd64 wine-devel-i386:i386
The following NEW packages will be installed:
  winehq-devel
The following packages will be DOWNGRADED:
  wine-devel wine-devel-amd64 wine-devel-i386:i386
0 upgraded, 1 newly installed, 3 downgraded, 0 to remove and 15 not upgraded.
Need to get 229 MB of archives.
After this operation, 8.414 kB disk space will be freed.
Do you want to continue? [Y/n]
For completeness, these are the Wine packages that are currently installed on my system:
ii  wine-devel                                       9.22~noble-1                                amd64        WINE Is Not An Emulator - runs MS Windows programs
ii  wine-devel-amd64                                 9.22~noble-1                                amd64        WINE Is Not An Emulator - runs MS Windows programs
ii  wine-devel-i386:i386                             9.22~noble-1                                i386         WINE Is Not An Emulator - runs MS Windows programs
ii  winehq-devel                                     9.22~noble-1                                amd64        WINE Is Not An Emulator - runs MS Windows programs
As a side note, in order to make sure no other Wine settings were influencing my tests, I installed the reMarkable application in a fresh, dedicated WINEPREFIX:
After this fresh install, the Gnome shell menu entry for the app didn’t work any more, so I had a look at the corresponding .desktop file in ~/.local/share/applications/wine/Programs/reMarkable/reMarkable.desktop. After some playing around I guess the problem was in missing double quotes around the path to the .exe file. The following works:
Ever since I had my new laptop (a Thinkpad T14s Gen4 AMD, bought in November 2023, currently running Ubuntu 24.04.1), I had tried to use it to play some movies with 5.1 surround sound via its HDMI port (connected to my 5.1 receiver), but I had never managed to make that work. Whereas on other systems the pavucontrol utility shows an HDMI 5.1 option (among others), no such thing was shown on this machine. It only showed “Play HiFi quality Music” and a “Pro Audio” option, neither of which mentioned anything about 5.1 surround sound. Moreover, the Ubuntu sound settings panel only showed the stereo option for speaker testing.
All those times before I had taken a quick look around the web to see if someone had written about a way to fix this. That didn’t seem to be the case and, given that my goal at those times was to watch a film, I usually switched to an alternative way to do that.
Until tonight. With some time to spare and no immediate intention to watch a film, I thought I’d try to see if I could dig a bit deeper. Surprisingly, this time it took me less than 10 minutes to find a forum post that helped me out.
In this topic on the Linux Mint forum user silmaril describes the same problem as I had, as well as the solution. Apparently, the ALSA Use Case Manager, or alsa-ucm tries to be smart and offer the right kind of configuration, but fails. In the solution they point to this page on the Arch wiki, which describes how to fix this. However, user silmaril took a more drastic route and simply used APT to remove the alsa-ucm-conf package. I did the same and after a
systemctl --user restart pipewire
The regular HDMI stereo and surround devices popped up in pavucontrol, and a test with a 5.1 film via VLC worked just fine.
No idea why I hadn’t found that topic on the Linux Mint forum before…
As I was running some manual package upgrades on my Ubuntu 24.04 server, I noticed that a kernel upgrade led to a long series of kernels being listed. This was strange, as there should have been only two or three. Closer inspection revealed that the update-grub command tries to find all kernels and also looks for kernels on ZFS datasets. Given that I extensively use ZFS, I was aware of that, and normally this is the behaviour I want.
However, in this case, my home server doesn’t have root on ZFS, but on a regular MD RAID mirror with LVM. Looking at the kernels listed during the upgrade, I noticed that update-grub was digging through all ZFS datasets and their snapshots on the server, including the backups sent to my home server from various other machines, some of which do have root on ZFS. All in all this led to a huge list of kernels and a kernel upgrade process that never seemed to end.
A quick web search pointed me to this AskUbuntu.com answer, which showed that the ZFS parsing code can be found in /etc/grub.d/10_linux_zfs. In there, I found the following code block (note, for improved readability I split the long command above the done over multiple lines and added corresponding \):
# List all the dataset with a root mountpointget_root_datasets(){localpools="$(zpool list | awk '{if (NR>1) print $1}')"for p in ${pools}; dolocalrel_pool_root=$(zpool get -H altroot ${p} | awk '{print $3}')if["${rel_pool_root}" = "-"]; thenrel_pool_root="/"fi
zfs list -H -o name,canmount,mountpoint -t filesystem | \
grep -E '^'"${p}"'(\s|/[[:print:]]*\s)(on|noauto)\s'"${rel_pool_root}"'$' | \
awk '{print $1}'done}
This function first lists all the ZFS pools on the system and then (with the last, long command above the done), for each of those, returns the filesystem datasets that can be mounted.
The solution was simple: because all backups from external systems end up as datasets below the remote_backups dataset on my storage pool, simply changed the last awk statement so that it only prints datasets that don’t match remote_backups by adding $1 !~ "remote_backups":
This way, the code would still work if I ever move this system to have root on ZFS, but now update-grub skips all backups and finds only the kernels relevant for my home server :-).
The spinning disk pool on my home server uses a mirrored special device (for storing metadata and small blocks, see also this blog post at Klara Systems) based on two NVMe SSDs. Because my home server only has two M.2 slots and I wanted to have a pure SSD ZFS pool as well, I partitioned the SSDs. Each SSD has a partition for the SSD pool and one for the special device of the storage pool (which uses a mirror of spinning disks).
Note: This isn’t really a recommended production setup as you are basically hurting performance of both the special device and the SSD pool. But for my home server this works fine. For example, I use the special device’s small blocks functionality to store previews of the photo’s I store on my Nextcloud server. This makes scrolling through the Memories app’s timeline a breeze, even though the full-size photo’s are stored on the spinning disks.
Today, I noticed that the special device had filled up, and, given that there was still some unpartitioned space on the SSDs, I wondered if I could just expand the partition (using parted) used by the special device and then have the ZFS pool recognise the extra space. In the past I have expanded partition-based ZFS pools before, e.g. on after upgrading the SSD on my laptop, but I hadn’t tried this with a special device before.
After some experimentation, I can tell you: this works.
Here is how I tested this on a throw-away file-backed zpool. First create four test files: two for the actual mirror pool and two that I’ll add as a special device.
for i in{0..3} ; do truncate -s 1G file$i.raw ; done
ls -lh
total 4,0K
-rw-rw-r-- 1 lennart lennart 1,0G mrt 11 12:46 file0.raw
-rw-rw-r-- 1 lennart lennart 1,0G mrt 11 12:46 file1.raw
-rw-rw-r-- 1 lennart lennart 1,0G mrt 11 12:46 file2.raw
-rw-rw-r-- 1 lennart lennart 1,0G mrt 11 12:46 file3.raw
Create a regular mirror pool:
zpool create testpool mirror $(pwd)/file0.raw $(pwd)/file1.raw
zpool list -v testpool
I wasn’t sure whether I could just truncate the backing files for the special device to a larger size while they were part of the pool, so I detached them one by one and created new ones of 2GB, and then reattached them:
Recently, I noticed that changed files were not picked up by the Nextcloud client as fast as before. As a result I sometimes missed a file (or changes in a file) on my laptop that had been created on my desktop PC.
Today, I tried to run tail and got the following message:
tail: inotify resources exhausted
tail: inotify cannot be used, reverting to polling
This made me realise that the problem with the delayed client sync could be related to the inotify system for monitoring file changes.
It turns out there is a maximum to the number of inotify file watches:
Given that on my desktop the Nextcloud client syncs about 235 GB with my personal Nextcloud server and about 10 GB to two servers for work (including several Git repositories), I could imagine the 65536 watches is not enough. Indeed, manually increasing that number made file syncs more or less instantaneous again:
Today I returned to my desktop computer after having been away for a couple of days, during which I only used my laptop. Both machines run Ubuntu Linux, currently version 23.04.
The project I was going to work on required R, but for some reason R didn’t start. No error message, only an exit status of 1 and I was back at the shell prompt. Running R --version worked fine, but Rscript failed in the same way as regular R. I tried running R --vanilla, starting R as a different user, nothing helped.
Time to dig deeper. Make sure all Ubuntu packages are up to date. Reinstall the r-base and r-base-core packages, check whether those packages had been recently updated (no), check whether the package versions were identical to the ones on my laptop (where R worked fine). Nothing…
Maybe there is problem with a (missing) dynamic library? In the (distant) past I have had problems with that, so it is worth a shot:
That’s strange: I usually don’t have stuff installed in /usr/local. What is this AppProtection library doing there? And then it hit me: I recently (the last time I had used my desktop PC) had to install Citrix’s ICA client to do some remote desktop work for one of my clients. When I installed that package I was asked something about installing some sort of app protection. I had selected “yes”… With a feature named like that I should have known better…
Anyway, time to see if this shared library was indeed the problem. I moved the /usr/local/lib/AppProtection/ directory out of the way and tried to start R. All was fine and dandy again! Except that even an ls command now gave an error:
$ ls /usr/local/lib/AppProtection
ERROR: ld.so: object '/usr/local/lib/AppProtection/libAppProtection.so' from /etc/ld.so.preload cannot be preloaded (cannot open shared object file): ignored.
ls: cannot access '/usr/local/lib/AppProtection': No such file or directory
ERROR: ld.so: object '/usr/local/lib/AppProtection/libAppProtection.so' from /etc/ld.so.preload cannot be preloaded (cannot open shared object file): ignored.
Apparently (obviously?), something still tried to preload the library, even though it no longer existed. It turns out this was done in the file /etc/ld.so.preload:
/usr/local/lib/AppProtection/libAppProtection.so
Given that this was the only content of that file, I opted to just delete it. Finally, my system is back in a working state.
Conclusion: be more careful when installing stuff from external sources and definitely don’t install anything you don’t really need, like Citrix’s App Protection.
P.S. It turns out this was also the reason why the Mattermost app wasn’t running successfully any more.
Here, we investigate the behaviour of LXD when moving containers between LXD cluster nodes, with a focus on various types of (filesystem) snapshots.
LXD containers can be snapshot by LXD itself, but in case one uses a ZFS storage backend, one can also use a tool like Sanoid to make snapshots of a container’s filesystem. When moving an LXD container from one LXD cluster node to another, one, of course, wants those filesystem snapshots to move along as well. Spoiler: this isn’t always the case.
Let’s create a test container on my home LXD cluster (which uses ZFS as default storage backend), starting on node wiske2:
lxc info snapmovetest | awk '$1=="Snapshots:" {toprint=1}; {if(toprint==1) {print $0}}'
Snapshots:
+-------+----------------------+------------+----------+
| NAME  |       TAKEN AT       | EXPIRES AT | STATEFUL |
+-------+----------------------+------------+----------+
| Test1 | 2023/03/11 22:22 CET |            | NO       |
+-------+----------------------+------------+----------+
| Test2 | 2023/03/11 22:22 CET |            | NO       |
+-------+----------------------+------------+----------+
At the ZFS level:
zfs list -rtall rpool/lxd/containers/snapmovetest
NAME                                               USED  AVAIL     REFER  MOUNTPOINT
rpool/lxd/containers/snapmovetest                 24.7M   192G      748M  legacy
rpool/lxd/containers/snapmovetest@snapshot-Test1    60K      -      748M  -
rpool/lxd/containers/snapmovetest@snapshot-Test2    60K      -      748M  -
All is fine! Now, let’s move the container to node wiske3:
lxc info snapmovetest | awk '$1=="Snapshots:" {toprint=1}; {if(toprint==1) {print $0}}'
Snapshots:
+-------+----------------------+------------+----------+
| NAME  |       TAKEN AT       | EXPIRES AT | STATEFUL |
+-------+----------------------+------------+----------+
| Test1 | 2023/03/11 22:22 CET |            | NO       |
+-------+----------------------+------------+----------+
| Test2 | 2023/03/11 22:22 CET |            | NO       |
+-------+----------------------+------------+----------+
At the ZFS level:
zfs list -rtall rpool/lxd/containers/snapmovetest
NAME                                               USED  AVAIL     REFER  MOUNTPOINT
rpool/lxd/containers/snapmovetest                  749M   202G      748M  legacy
rpool/lxd/containers/snapmovetest@snapshot-Test1    60K      -      748M  -
rpool/lxd/containers/snapmovetest@snapshot-Test2    60K      -      748M  -
So far so good: snapshots taken with the native LXD toolchain get moved. Now let’s manually create a ZFS snapshot:
zfs snapshot rpool/lxd/containers/snapmovetest@manual_zfs_snap
zfs list -rtall rpool/lxd/containers/snapmovetest
lxc info snapmovetest | awk '$1=="Snapshots:" {toprint=1}; {if(toprint==1) {print $0}}'
Snapshots:
+-------+----------------------+------------+----------+
| NAME  |       TAKEN AT       | EXPIRES AT | STATEFUL |
+-------+----------------------+------------+----------+
| Test1 | 2023/03/11 22:22 CET |            | NO       |
+-------+----------------------+------------+----------+
| Test2 | 2023/03/11 22:22 CET |            | NO       |
+-------+----------------------+------------+----------+
zfs list -rtall rpool/lxd/containers/snapmovetest
NAME                                               USED  AVAIL     REFER  MOUNTPOINT
rpool/lxd/containers/snapmovetest                  749M   191G      748M  legacy
rpool/lxd/containers/snapmovetest@snapshot-Test1    60K      -      748M  -
rpool/lxd/containers/snapmovetest@snapshot-Test2    60K      -      748M  -
Somehow, the ZFS-level snapshot has been removed… I guess this part of the LXD manual should be written in bold (emphasis mine):
LXD assumes that it has full control over the ZFS pool and dataset. Therefore, you should never maintain any datasets or file system entities that are not owned by LXD in a ZFS pool or dataset, because LXD might delete them.
Consequently, in a LXD cluster one shouldn’t use Sanoid to make snapshots ZFS-backed LXD container filesystems. Instead, use LXD’s builtin automatic snapshot capabilities (see the snapshots.expiry and snapshots.schedule options).
Today I upgraded the Bash language server (to v3.0.3), after which I noticed that it stopped working. When loading a .bash file, the language server didn’t load and told me to look in the error output for more information. In Emacs, the errors of the Bash language server can be found in the *bash-ls::stderr* buffer, which showed me:
/home/lennart/.emacs.d/.cache/lsp/npm/bash-language-server/lib/node_modules/bash-language-server/node_modules/vscode-jsonrpc/lib/common/linkedMap.js:40
        return this._head?.value;
                          ^

SyntaxError: Unexpected token '.'
    at wrapSafe (internal/modules/cjs/loader.js:915:16)
    at Module._compile (internal/modules/cjs/loader.js:963:27)
    at Object.Module._extensions..js (internal/modules/cjs/loader.js:1027:10)
    at Module.load (internal/modules/cjs/loader.js:863:32)
    at Function.Module._load (internal/modules/cjs/loader.js:708:14)
    at Module.require (internal/modules/cjs/loader.js:887:19)
    at require (internal/modules/cjs/helpers.js:74:18)
    at Object.<anonymous> (/home/lennart/.emacs.d/.cache/lsp/npm/bash-language-server/lib/node_modules/bash-language-server/node_modules/vscode-jsonrpc/lib/common/api.js:37:21)
    at Module._compile (internal/modules/cjs/loader.js:999:30)
    at Object.Module._extensions..js (internal/modules/cjs/loader.js:1027:10)
I re-ran lsp-install-server, which pointed out that I had nodejs v12.22.5 installed and the language server required v14 or higher.
Time to figure out how to install a newer nodejs version on my Ubuntu 21.10 machine. It turns out that v12 is no longer maintained. The current LTS version of nodejs is v16. Here I found instructions on how to install a given version of nodejs on Ubuntu. For v16, this boils down to running
The script that this command fetches (and executes as root) is quite elaborate, but in the end it simply creates the file /etc/apt/sources.list.d/nodesource.list, with the following contents:
deb [signed-by=/usr/share/keyrings/nodesource.gpg] https://deb.nodesource.com/node_16.x impish main
deb-src [signed-by=/usr/share/keyrings/nodesource.gpg] https://deb.nodesource.com/node_16.x impish main
After that, a simple apt upgrade didn’t suffice. The nodejs upgrade was held back because of a dependency problem. Even an explicit upgrade of the nodejs package didn’t work:
$ sudo apt upgrade nodejs
Reading package lists... Done
Building dependency tree... Done
Reading state information... Done
Calculating upgrade... Done
Some packages could not be installed. This may mean that you have
requested an impossible situation or if you are using the unstable
distribution that some required packages have not yet been created
or been moved out of Incoming.
The following information may help to resolve the situation:

The following packages have unmet dependencies.
 libnode72 : Conflicts: nodejs-legacy
E: Broken packages
So, I resorted to a full apt dist-upgrade, which worked fine. After that, I reopened a Bash script and all was fine.
A couple of days ago, I bought myself a 5TB Seagate Expansion Portable drive. This is an 2.5″ external spinning hard disk that connects over USB. In a review on a well-known Dutch website for IT enthusiasts, I read that inside, the drive consists of an ST5000LM000 hard drive and a USB to SATA chip (in contrast to other manufacturers like WD that solder the USB connector directly on the drives circuit board).
After connecting the drive to my computer (that currently runs Ubuntu 21.10), I wanted to see what I could learn about the drive in terms of SMART information. So I tried:
$ sudo smartctl -a /dev/sda
smartctl 7.2 2020-12-30 r5155 [x86_64-linux-5.13.0-41-generic] (local build)
Copyright (C) 2002-20, Bruce Allen, Christian Franke, www.smartmontools.org

Read Device Identity failed: scsi error unsupported field in scsi command

A mandatory SMART command failed: exiting. To continue, add one or more '-T permissive' options.
Trying the suggested -T option didn’t help. So I played around with the -d option that I had used before trying to connect to hard drives behind RAID controllers. That looked better:
$ sudo smartctl -a /dev/sda -T conservative -d sat,auto
smartctl 7.2 2020-12-30 r5155 [x86_64-linux-5.13.0-41-generic] (local build)
Copyright (C) 2002-20, Bruce Allen, Christian Franke, www.smartmontools.org

=== START OF INFORMATION SECTION ===
Vendor:               Seagate
Product:              Expansion HDD
Revision:             1901
Compliance:           SPC-4
User Capacity:        5.000.981.077.504 bytes [5,00 TB]
Logical block size:   512 bytes
Physical block size:  4096 bytes
LU is fully provisioned
Logical Unit id:      0x3e41434334313346
Serial number:        00000000NACC413F
Device type:          disk
Local Time is:        Thu May 19 21:54:04 2022 CEST
SMART support is:     Unavailable - device lacks SMART capability.

=== START OF READ SMART DATA SECTION ===
Current Drive Temperature:     0 C
Drive Trip Temperature:        0 C

Error Counter logging not supported

No Self-tests have been logged
The drive reports the correct size, but also says there is not SMART support. In fact, using -d scsi gave identical output. Because there should only be this USB to SATA translation layer I thought that somehow I should be able to get the SMART commands to work. Looking through the smartmontools website, I came across this article that explains the “SAT with UAS” situation. It seems that the high speed UAS driver disables SAT transfers in certain cases. The workaround is to tell the kernel to use the older usb-storage driver instead of the uas driver. With the lsusb command I identified the manufacturer and device ID of the drive:
$ lsusb | grep -i seagate
Bus 004 Device 012: ID 0bc2:2037 Seagate RSS LLC Expansion HDD
Next, I made sure to unmount and disconnect the drive and then instructed the kernel to use the old driver for this device:
$ echo "0x0bc2:0x2037:u" | sudo tee /sys/module/usb_storage/parameters/quirks
and reconnected the drive. I verified in the kernel logs that the usb-storage driver was indeed used:
mei 19 22:08:30 barabas kernel: usb 4-3.3: new SuperSpeed USB device number 12 using xhci_hcd
mei 19 22:08:30 barabas mtp-probe[983206]: checking bus 4, device 12: "/sys/devices/pci0000:00/0000:00:08.1/0000:0c:00.3/usb4/4-3/4-3.3"
mei 19 22:08:30 barabas mtp-probe[983206]: bus: 4, device: 12 was not an MTP device
mei 19 22:08:30 barabas kernel: usb 4-3.3: New USB device found, idVendor=0bc2, idProduct=2037, bcdDevice=19.01
mei 19 22:08:30 barabas kernel: usb 4-3.3: New USB device strings: Mfr=1, Product=2, SerialNumber=3
mei 19 22:08:30 barabas kernel: usb 4-3.3: Product: Expansion HDD
mei 19 22:08:30 barabas kernel: usb 4-3.3: Manufacturer: Seagate
mei 19 22:08:30 barabas kernel: usb 4-3.3: SerialNumber: 00000000NACC413F
mei 19 22:08:30 barabas kernel: usb 4-3.3: UAS is ignored for this device, using usb-storage instead
mei 19 22:08:30 barabas kernel: usb-storage 4-3.3:1.0: USB Mass Storage device detected
mei 19 22:08:30 barabas kernel: usb-storage 4-3.3:1.0: Quirks match for vid 0bc2 pid 2037: 800000
mei 19 22:08:30 barabas kernel: scsi host6: usb-storage 4-3.3:1.0
Notice the “UAS is ignored” message. And lo and behold, smartctl now works and shows all relevant information:
$ sudo smartctl -a /dev/sda
smartctl 7.2 2020-12-30 r5155 [x86_64-linux-5.13.0-41-generic] (local build)
Copyright (C) 2002-20, Bruce Allen, Christian Franke, www.smartmontools.org

=== START OF INFORMATION SECTION ===
Model Family:     Seagate Barracuda 2.5 5400
Device Model:     ST5000LM000-2U8170
Serial Number:    WCJ6AG24
LU WWN Device Id: 5 000c50 0e0939684
Firmware Version: 0001
User Capacity:    5.000.981.078.016 bytes [5,00 TB]
Sector Sizes:     512 bytes logical, 4096 bytes physical
Rotation Rate:    5400 rpm
Form Factor:      2.5 inches
Device is:        In smartctl database [for details use: -P show]
ATA Version is:   ACS-3 T13/2161-D revision 3b
SATA Version is:  SATA 3.1, 6.0 Gb/s (current: 6.0 Gb/s)
Local Time is:    Thu May 19 22:30:52 2022 CEST
SMART support is: Available - device has SMART capability.
SMART support is: Enabled

=== START OF READ SMART DATA SECTION ===
SMART overall-health self-assessment test result: PASSED

General SMART Values:
Offline data collection status:  (0x00)	Offline data collection activity
					was never started.
					Auto Offline Data Collection: Disabled.
Self-test execution status:      (   0)	The previous self-test routine completed
					without error or no self-test has ever
					been run.
Total time to complete Offline
data collection: 		(    0) seconds.
Offline data collection
capabilities: 			 (0x71) SMART execute Offline immediate.
					No Auto Offline data collection support.
					Suspend Offline collection upon new
					command.
					No Offline surface scan supported.
					Self-test supported.
					Conveyance Self-test supported.
					Selective Self-test supported.
SMART capabilities:            (0x0003)	Saves SMART data before entering
					power-saving mode.
					Supports SMART auto save timer.
Error logging capability:        (0x01)	Error logging supported.
					General Purpose Logging supported.
Short self-test routine
recommended polling time: 	 (   1) minutes.
Extended self-test routine
recommended polling time: 	 ( 827) minutes.
Conveyance self-test routine
recommended polling time: 	 (   2) minutes.
SCT capabilities: 	       (0x7035)	SCT Status supported.
					SCT Feature Control supported.
					SCT Data Table supported.

SMART Attributes Data Structure revision number: 10
Vendor Specific SMART Attributes with Thresholds:
ID# ATTRIBUTE_NAME          FLAG     VALUE WORST THRESH TYPE      UPDATED  WHEN_FAILED RAW_VALUE
  1 Raw_Read_Error_Rate     0x000f   067   065   006    Pre-fail  Always       -       5367808
  3 Spin_Up_Time            0x0003   100   100   000    Pre-fail  Always       -       0
  4 Start_Stop_Count        0x0032   100   100   020    Old_age   Always       -       10
  5 Reallocated_Sector_Ct   0x0033   100   100   036    Pre-fail  Always       -       0
  7 Seek_Error_Rate         0x000f   100   253   045    Pre-fail  Always       -       3765
  9 Power_On_Hours          0x0032   100   100   000    Old_age   Always       -       0 (86 255 0)
 10 Spin_Retry_Count        0x0013   100   100   097    Pre-fail  Always       -       0
 12 Power_Cycle_Count       0x0032   100   100   020    Old_age   Always       -       9
184 End-to-End_Error        0x0032   100   100   099    Old_age   Always       -       0
187 Reported_Uncorrect      0x0032   100   100   000    Old_age   Always       -       0
188 Command_Timeout         0x0032   100   100   000    Old_age   Always       -       0
189 High_Fly_Writes         0x003a   100   100   000    Old_age   Always       -       0
190 Airflow_Temperature_Cel 0x0022   069   069   040    Old_age   Always       -       31 (Min/Max 29/31)
191 G-Sense_Error_Rate      0x0032   100   100   000    Old_age   Always       -       0
192 Power-Off_Retract_Count 0x0032   100   100   000    Old_age   Always       -       2
193 Load_Cycle_Count        0x0032   100   100   000    Old_age   Always       -       23
194 Temperature_Celsius     0x0022   031   040   000    Old_age   Always       -       31 (0 19 0 0 0)
197 Current_Pending_Sector  0x0012   100   100   000    Old_age   Always       -       0
198 Offline_Uncorrectable   0x0010   100   100   000    Old_age   Offline      -       0
199 UDMA_CRC_Error_Count    0x003e   200   200   000    Old_age   Always       -       0
240 Head_Flying_Hours       0x0000   100   253   000    Old_age   Offline      -       0 (7 164 0)
241 Total_LBAs_Written      0x0000   100   253   000    Old_age   Offline      -       1723222
242 Total_LBAs_Read         0x0000   100   253   000    Old_age   Offline      -       3644586

SMART Error Log Version: 1
No Errors Logged

SMART Self-test log structure revision number 1
No self-tests have been logged.  [To run self-tests, use: smartctl -t]

SMART Selective self-test log data structure revision number 1
 SPAN  MIN_LBA  MAX_LBA  CURRENT_TEST_STATUS
    1        0        0  Not_testing
    2        0        0  Not_testing
    3        0        0  Not_testing
    4        0        0  Not_testing
    5        0        0  Not_testing
Selective self-test flags (0x0):
  After scanning selected spans, do NOT read-scan remainder of disk.
If Selective self-test is pending on power-up, resume after 0 minute delay.
Now that I know how to do this, let’s undo the “use usb-storage driver instead of the uas driver” (alternatively, a reboot should also work, but who wants that?):
$ echo "" | sudo tee /sys/module/usb_storage/parameters/quirks
I will use this drive as a backup drive while I am travelling, so the aim of this post is not only to inform you as my reader(s), but also to remind my future self of how I did this. Now I only need to remember to check the SMART values every once in a while :-).