Today the Lenovo Thunderbolt 3 Essential dock I had ordered just before the new year arrived. My current laptop is a 6th Gen Lenovo Thinkpad X1 Carbon, which actually has two Tunderbolt 3 (TB3) ports. For a while the cable mess on my desk had been bothering me and a dock looked like a good way to get rid of both the clutter and the fact that I had to plug in a power cable, an HDMI cable, a USB cable and a network cable. The latter was especially tricky, because my laptop doesn’t have a dedicated ethernet port, but instead has a dongle that plugs into one of the TB3 ports. Of course, I didn’t want it to happen that I was on the road without the dongle, so double checking and making sure I had it in my bag was a regular worry.
With the TB3 Essential dock all this should be over. The dock is pretty well equipped:
- 1 ethernet port (1Gbps)
- 1 HDMI 2.0 port
- 1 DisplayPort 1.4
- 2 USB A 3.0 1.5Gbps ports
- 2 USB C 10Gbps ports (no video support)
- 1 3.5 mm audio jack.
The one thing that remained to be seen, of course, was whether the all those ports would work under Linux as well. I read some promising reports for other TB3-based docks from Lenovo, so I decided to order it.
After connecting the various cables to the dock came the moment supreme: I plugged in the TB3 cable to the laptop. And… The display connected to the HDMI port lit up. So far, so good! No USB functionality, however. Time to dive into the BIOS, because I remembered having seen some settings there, including some security related ones.
In the BIOS I couldn’t change the TB3 security setting because, as the help message explained, the graphics memory was set to 512MB. I’m not sure why this is an issue, but I looked up the graphics RAM setting and reduced it to 256MB. Next, I went back to the TB settings and set the security level to the first option: “No security”, followed by a reboot. Now, everything worked. That is one step in the right direction.
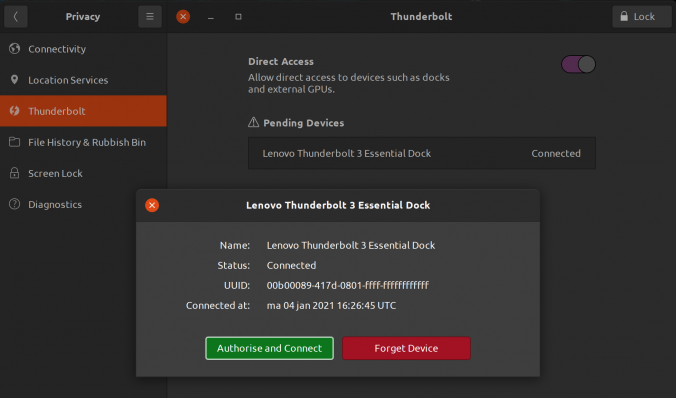
However, I wasn’t willing to forgo all security, so I went back to the BIOS settings and set the security level to “Secure Connection” (according to this blog post at dell.com this is security level 2 or SL2). I rebooted and indeed, no USB. So I went to Ubuntu’s Thunderbolt settings and there I had to press the ‘Unlock’ button in the top right corner, after which I could click on a button authorise the dock. After that all connections worked again. From the commandline, the boltctl utility can be used to see more information on the connected thunderbolt devices. This is the output for an unauthorised device:
$ boltctl list
? Lenovo Thunderbolt 3 Essential Dock
  ?? type:          peripheral
  ?? name:          Thunderbolt 3 Essential Dock
  ?? vendor:        Lenovo
  ?? uuid:          00b00089-417d-0801-ffff-ffffffffffff
  ?? status:        connected
  ?  ?? domain:     ca030000-0070-6f08-2382-4312b0238921
  ?  ?? authflags:  none
  ?? connected:     ma 04 jan 2021 16:26:45 UTC
  ?? stored:        ma 04 jan 2021 16:20:57 UTC
     ?? policy:     iommu
     ?? key:        no
And this is the output after clicking the “Authorise” button in the Ubuntu settings:
? boltctl list
? Lenovo Thunderbolt 3 Essential Dock
  ?? type:          peripheral
  ?? name:          Thunderbolt 3 Essential Dock
  ?? vendor:        Lenovo
  ?? uuid:          00b00089-417d-0801-ffff-ffffffffffff
  ?? status:        authorized
  ?  ?? domain:     ca030000-0070-6f08-2382-4312b0238921
  ?  ?? authflags:  none
  ?? authorized:    ma 04 jan 2021 16:30:07 UTC
  ?? connected:     ma 04 jan 2021 16:26:45 UTC
  ?? stored:        ma 04 jan 2021 16:20:57 UTC
     ?? policy:     iommu
     ?? key:        yes (new)
Nice!
However, my joy was shortlived, because after disconnecting and reconnecting the dock, the USB ports had stopped working again. The device had to be authorised again. This seemed tedious, so I set about reading more in the boltctl man page and found that there was a way to enroll a device permanently. So that is what I did. First I removed its UUID from the database:
$ boltctl forget 00b00089-417d-0801-ffff-ffffffffffff
And then added it again, this time with the auto policy:
$ boltctl enroll --policy auto 00b00089-417d-0801-ffff-ffffffffffff
 ? Lenovo Thunderbolt 3 Essential Dock
   ?? type:          peripheral
   ?? name:          Thunderbolt 3 Essential Dock
   ?? vendor:        Lenovo
   ?? uuid:          00b00089-417d-0801-ffff-ffffffffffff
   ?? dbus path:     /org/freedesktop/bolt/devices/00b00089_417d_0801_ffff_ffffffffffff
   ?? status:        authorized
   ?  ?? domain:     ca030000-0070-6f08-2382-4312b0238921
   ?  ?? parent:     ca030000-0070-6f08-2382-4312b0238921
   ?  ?? syspath:    /sys/devices/pci0000:00/0000:00:1d.0/0000:05:00.0/0000:06:00.0/0000:07:00.0/domain0/0-0/0-1
   ?  ?? authflags:  secure
   ?? authorized:    ma 04 jan 2021 22:33:08 UTC
   ?? connected:     ma 04 jan 2021 22:32:43 UTC
   ?? stored:        ma 04 jan 2021 16:20:57 UTC
      ?? policy:     auto
      ?? key:        yes
As you can see from the boltctl list output below, the policy is now set to auto (instead of the previous iommu):
$ boltctl list
 ? Lenovo Thunderbolt 3 Essential Dock
   ?? type:          peripheral
   ?? name:          Thunderbolt 3 Essential Dock
   ?? vendor:        Lenovo
   ?? uuid:          00b00089-417d-0801-ffff-ffffffffffff
   ?? status:        authorized
   ?  ?? domain:     ca030000-0070-6f08-2382-4312b0238921
   ?  ?? authflags:  secure
   ?? authorized:    ma 04 jan 2021 22:41:46 UTC
   ?? connected:     ma 04 jan 2021 22:41:45 UTC
   ?? stored:        ma 04 jan 2021 16:20:57 UTC
      ?? policy:     auto
      ?? key:        yes
Now I can disconnect and reconnect the dock without problems :-).
I also tested the 3.5mm audio port, which worked (at least for listening, I didn’t have a headset with microphone at hand). Same for the two USB A and the two USB C ports. Finally, I tested the DisplayPort and that worked too. In fact, connecting my 3440×1440 screen via both HDMI and DP to the dock worked fine. The Ubuntu display settings showed a “3 monitor” setup, two 3440×1440 screens and the latop’s own screen at 2560×1440.
So, in conclusion: the Lenovo Thunderbolt 3 Essential dock is fully supported under Ubuntu 20.04.
Thanks to this blog post at FunnelFiasco.com for pointing me to the boltctl utility!