Edit: Since the LaTeX beamer class already contains an example environment I renamed mine to latexample
During my stay at the National University of Rwanda I gave a LaTeX course to the Master’s students of the department of mathematics. For this course I wrote my own lecture notes (which I will put up on the web some other time), and already quite early in the process I found out I wanted an environment or something similar that would allow me to split the page in two and display some LaTeX code in the first column and the resulting output in the second column. It took me some time to figure it out (and it’s far from perfect and/or fool-proof), but it does the trick for most simple examples I wanted to show.
So, without further ado, here’s the code:
1
2
3
4
5
6
7
8
9
10
11
12
13
14
15
16
17
18
19
20
21
22
23
24
25
26
27
| \usepackage[dvipsnames,pdftex]{xcolor}
\definecolor{lstbgcolor}{rgb}{0.9,0.9,0.9}
\usepackage{listings}
\lstloadlanguages{[LaTeX]TeX}
\usepackage{fancyvrb}
\newenvironment{latexample}[1][language={[LaTeX]TeX}]
{\lstset{backgroundcolor=\color{lstbgcolor},
keywordstyle=\color[rgb]{0,0,1},
commentstyle=\color[rgb]{0.133,0.545,0.133},
stringstyle=\color[rgb]{0.627,0.126,0.941},
breaklines=true,
prebreak = \raisebox{0ex}[0ex][0ex]{\ensuremath{\hookleftarrow}},
frame=single,
language={[LaTeX]TeX},
basicstyle=\footnotesize\ttfamily, #1}
\VerbatimEnvironment\begin{VerbatimOut}{latexample.verb.out}}
{\end{VerbatimOut}\noindent
\begin{minipage}{0.5\linewidth}
\lstinputlisting[]{latexample.verb.out}%
\end{minipage}\qquad
\begin{minipage}{0.4\linewidth}
\input{latexample.verb.out}
\end{minipage}\\
} |
\usepackage[dvipsnames,pdftex]{xcolor}
\definecolor{lstbgcolor}{rgb}{0.9,0.9,0.9}

\usepackage{listings}
\lstloadlanguages{[LaTeX]TeX}

\usepackage{fancyvrb}

\newenvironment{latexample}[1][language={[LaTeX]TeX}]
{\lstset{backgroundcolor=\color{lstbgcolor},
    keywordstyle=\color[rgb]{0,0,1},
    commentstyle=\color[rgb]{0.133,0.545,0.133},
    stringstyle=\color[rgb]{0.627,0.126,0.941},
    breaklines=true,
    prebreak = \raisebox{0ex}[0ex][0ex]{\ensuremath{\hookleftarrow}},
    frame=single,
    language={[LaTeX]TeX},
    basicstyle=\footnotesize\ttfamily, #1}
  \VerbatimEnvironment\begin{VerbatimOut}{latexample.verb.out}}
  {\end{VerbatimOut}\noindent
  \begin{minipage}{0.5\linewidth}
    \lstinputlisting[]{latexample.verb.out}%
  \end{minipage}\qquad
  \begin{minipage}{0.4\linewidth}
    \input{latexample.verb.out}
  \end{minipage}\\
}
In the first seven lines the necessary packages are loaded, the other lines make up the definition of the environment. In line 9 the environment is given its name and we define one argument. In lines 10 to 18 we define the options for the listing environment. Then, in line 19 we use \VerbatimEnvironment followed by the VerbatimOut environment from the fancyvrb package to write everything that’s inside the environment into a file called latexample.verb.out. This concludes the actions that are done at the opening of the example environment. When the example environment is closed lines 20 to 26 are executed. The VerbatimOut is closed and then we start setting up to minipages. The left one contains the text we put into the example environment as an lstlisting read from the latexample.verb.out file (line 22), the right one contains the rendered text by using LaTeX’s \input command (line 25).
This is what it looks like:
This example was made with the following code:
1
2
3
4
5
6
7
8
9
10
11
12
13
14
15
16
17
18
| \begin{verbatim}
\begin{latexample}
... LaTeX code here ...
\end{latexample}
\end{verbatim}
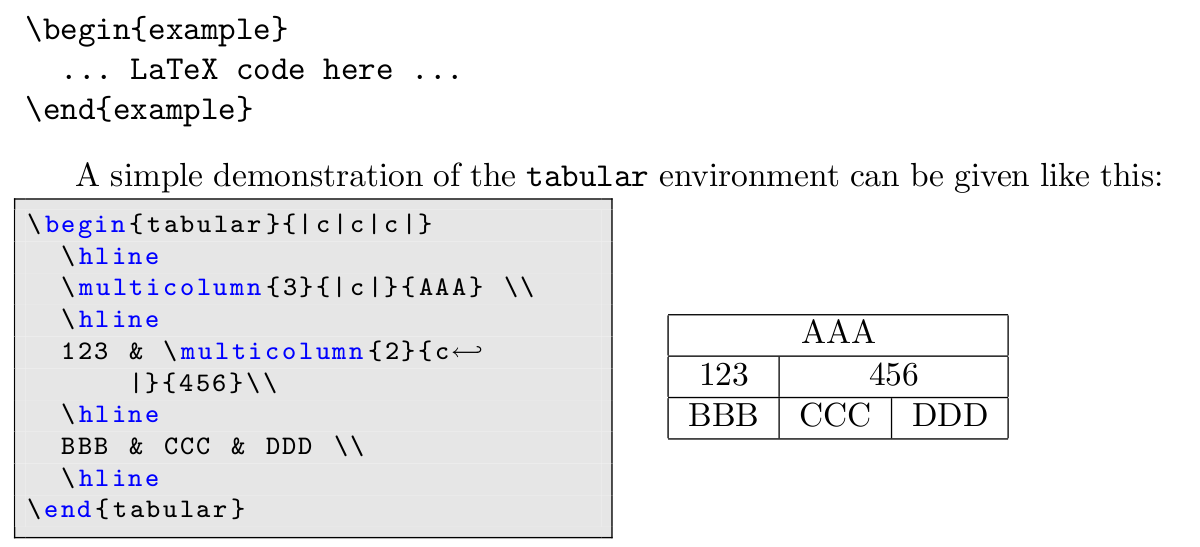
A simple demonstration of the \verb|tabular| environment can be given like this:
\begin{latexample}[]
\begin{tabular}{|c|c|c|}
\hline
\multicolumn{3}{|c|}{AAA} \\
\hline
123 & \multicolumn{2}{c|}{456}\\
\hline
BBB & CCC & DDD \\
\hline
\end{tabular}
\end{latexample} |
\begin{verbatim}
\begin{latexample}
  ... LaTeX code here ...
\end{latexample}
\end{verbatim}

A simple demonstration of the \verb|tabular| environment can be given like this:
\begin{latexample}[]
\begin{tabular}{|c|c|c|}
  \hline
  \multicolumn{3}{|c|}{AAA} \\
  \hline
  123 & \multicolumn{2}{c|}{456}\\
  \hline
  BBB & CCC & DDD \\
  \hline
\end{tabular}
\end{latexample}
In the first seven lines the necessary packages are loaded, the other lines make up the definition of the environment. In line 9 the environment is given its name and we define one argument. In lines 10 to 18 we define the options for the listing environment. Then, in line 19 we use \VerbatimEnvironment followed by the VerbatimOut environment from the fancyvrb package to write everything that’s inside the environment into a file called latexample.verb.out. This concludes that actions that are done before the text is rendered. When the environment is closed lines 20 to 26 are executed. The VerbatimOut is closed and then we start setting up to minipages. The left one contains the text we put into the example environment as an lstlisting read from the latexample.verb.out file (line 22), the right one contains the rendered text by using LaTeX’s \input command (line 25).
The environment accepts an optional argument. This argument can be one or more options that are passed on to the <>lstset option list for the lstlisting environment. By default it is set to language={[LaTeX]TeX}. For some reason that I haven’t been able to identify yet, the argument must be given, even if empty (see the example above, which starts the evironment with \begin{latexample}[]. The two [] give the empty option list. This is the reason why in line 17 of the definition we set language={[LaTeX]TeX}, even though I also did this in the environment definition in line 9. I wanted to make the argument optional, but haven’t gotten it to work that way.
So, as mentioned earlier, this environment is far from perfect. Things that involve counters (like \chapter and other sectioning commands, but also numbered equations and figures) don’t work in the sense that the numbering in the example is not separate from the rest of the document. So if you put a numbered equation in the example the equations following the example will have their numbers increased by one. I’m working on a slightly more complex definition of the latexample environment that closes that bug.
Related Images: