Notes about open source software, computers, other stuff.

Tag: Ubuntu (Page 1 of 5)

Fixing absence of 5.1 surround sound options on an AMD Linux laptop

Ever since I had my new laptop (a Thinkpad T14s Gen4 AMD, bought in November 2023, currently running Ubuntu 24.04.1), I had tried to use it to play some movies with 5.1 surround sound via its HDMI port (connected to my 5.1 receiver), but I had never managed to make that work. Whereas on other systems the pavucontrol utility shows an HDMI 5.1 option (among others), no such thing was shown on this machine. It only showed “Play HiFi quality Music” and a “Pro Audio” option, neither of which mentioned anything about 5.1 surround sound. Moreover, the Ubuntu sound settings panel only showed the stereo option for speaker testing.

All those times before I had taken a quick look around the web to see if someone had written about a way to fix this. That didn’t seem to be the case and, given that my goal at those times was to watch a film, I usually switched to an alternative way to do that.

Until tonight. With some time to spare and no immediate intention to watch a film, I thought I’d try to see if I could dig a bit deeper. Surprisingly, this time it took me less than 10 minutes to find a forum post that helped me out.

In this topic on the Linux Mint forum user silmaril describes the same problem as I had, as well as the solution. Apparently, the ALSA Use Case Manager, or alsa-ucm tries to be smart and offer the right kind of configuration, but fails. In the solution they point to this page on the Arch wiki, which describes how to fix this. However, user silmaril took a more drastic route and simply used APT to remove the alsa-ucm-conf package. I did the same and after a

systemctl --user restart pipewire

The regular HDMI stereo and surround devices popped up in pavucontrol, and a test with a 5.1 film via VLC worked just fine.

No idea why I hadn’t found that topic on the Linux Mint forum before…

Related Images:

Telling update-grub to ignore my ZFS backups

As I was running some manual package upgrades on my Ubuntu 24.04 server, I noticed that a kernel upgrade led to a long series of kernels being listed. This was strange, as there should have been only two or three. Closer inspection revealed that the update-grub command tries to find all kernels and also looks for kernels on ZFS datasets. Given that I extensively use ZFS, I was aware of that, and normally this is the behaviour I want.

However, in this case, my home server doesn’t have root on ZFS, but on a regular MD RAID mirror with LVM. Looking at the kernels listed during the upgrade, I noticed that update-grub was digging through all ZFS datasets and their snapshots on the server, including the backups sent to my home server from various other machines, some of which do have root on ZFS. All in all this led to a huge list of kernels and a kernel upgrade process that never seemed to end.

A quick web search pointed me to this AskUbuntu.com answer, which showed that the ZFS parsing code can be found in /etc/grub.d/10_linux_zfs. In there, I found the following code block (note, for improved readability I split the long command above the done over multiple lines and added corresponding \):

# List all the dataset with a root mountpoint
get_root_datasets() {
    local pools="$(zpool list | awk '{if (NR>1) print $1}')"

    for p in ${pools}; do
        local rel_pool_root=$(zpool get -H altroot ${p} | awk '{print $3}')
        if [ "${rel_pool_root}" = "-" ]; then
            rel_pool_root="/"
        fi

        zfs list -H -o name,canmount,mountpoint -t filesystem | \
            grep -E '^'"${p}"'(\s|/[[:print:]]*\s)(on|noauto)\s'"${rel_pool_root}"'$' | \
            awk '{print $1}'
    done
}

This function first lists all the ZFS pools on the system and then (with the last, long command above the done), for each of those, returns the filesystem datasets that can be mounted.

The solution was simple: because all backups from external systems end up as datasets below the remote_backups dataset on my storage pool, simply changed the last awk statement so that it only prints datasets that don’t match remote_backups by adding $1 !~ "remote_backups":

zfs list -H -o name,canmount,mountpoint -t filesystem | \
    grep -E '^'"${p}"'(\s|/[[:print:]]*\s)(on|noauto)\s'"${rel_pool_root}"'$' | \
    awk '$1 !~ "remote_backups" {print $1}'

This way, the code would still work if I ever move this system to have root on ZFS, but now update-grub skips all backups and finds only the kernels relevant for my home server :-).

Related Images:

Fixing delayed syncing with Linux Nextcloud client

Recently, I noticed that changed files were not picked up by the Nextcloud client as fast as before. As a result I sometimes missed a file (or changes in a file) on my laptop that had been created on my desktop PC.

Today, I tried to run tail and got the following message:

tail: inotify resources exhausted
tail: inotify cannot be used, reverting to polling

This made me realise that the problem with the delayed client sync could be related to the inotify system for monitoring file changes.

It turns out there is a maximum to the number of inotify file watches:

sysctl fs.inotify
fs.inotify.max_queued_events = 16384
fs.inotify.max_user_instances = 128
fs.inotify.max_user_watches = 524288

Given that on my desktop the Nextcloud client syncs about 235 GB with my personal Nextcloud server and about 10 GB to two servers for work (including several Git repositories), I could imagine the 65536 watches is not enough. Indeed, manually increasing that number made file syncs more or less instantaneous again:

sysctl -n -w fs.inotify.max_user_watches=524288
sysctl fs.inotify
524288
fs.inotify.max_queued_events = 16384
fs.inotify.max_user_instances = 128
fs.inotify.max_user_watches = 524288

To make these changes permanent I added the following lines at the bottom of /etc/sysctl.conf:

grep -A1 inotify /etc/sysctl.conf
# Increase the number of inotify watches so that the Nextcloud client
# keeps syncing without delay
fs.inotify.max_user_watches=524288

Side note: to apply the changes in the /etc/sysctl.conf file use sudo sysctl -p.

Related Images:

Upgrading nodejs to the latest LTS release on Ubuntu 21.10

Today I upgraded the Bash language server (to v3.0.3), after which I noticed that it stopped working. When loading a .bash file, the language server didn’t load and told me to look in the error output for more information. In Emacs, the errors of the Bash language server can be found in the *bash-ls::stderr* buffer, which showed me:

/home/lennart/.emacs.d/.cache/lsp/npm/bash-language-server/lib/node_modules/bash-language-server/node_modules/vscode-jsonrpc/lib/common/linkedMap.js:40
        return this._head?.value;
                          ^

SyntaxError: Unexpected token '.'
    at wrapSafe (internal/modules/cjs/loader.js:915:16)
    at Module._compile (internal/modules/cjs/loader.js:963:27)
    at Object.Module._extensions..js (internal/modules/cjs/loader.js:1027:10)
    at Module.load (internal/modules/cjs/loader.js:863:32)
    at Function.Module._load (internal/modules/cjs/loader.js:708:14)
    at Module.require (internal/modules/cjs/loader.js:887:19)
    at require (internal/modules/cjs/helpers.js:74:18)
    at Object.<anonymous> (/home/lennart/.emacs.d/.cache/lsp/npm/bash-language-server/lib/node_modules/bash-language-server/node_modules/vscode-jsonrpc/lib/common/api.js:37:21)
    at Module._compile (internal/modules/cjs/loader.js:999:30)
    at Object.Module._extensions..js (internal/modules/cjs/loader.js:1027:10)

I re-ran lsp-install-server, which pointed out that I had nodejs v12.22.5 installed and the language server required v14 or higher.

Time to figure out how to install a newer nodejs version on my Ubuntu 21.10 machine. It turns out that v12 is no longer maintained. The current LTS version of nodejs is v16. Here I found instructions on how to install a given version of nodejs on Ubuntu. For v16, this boils down to running

curl -sL https://deb.nodesource.com/setup_16.x | sudo bash -

The script that this command fetches (and executes as root) is quite elaborate, but in the end it simply creates the file /etc/apt/sources.list.d/nodesource.list, with the following contents:

deb [signed-by=/usr/share/keyrings/nodesource.gpg] https://deb.nodesource.com/node_16.x impish main
deb-src [signed-by=/usr/share/keyrings/nodesource.gpg] https://deb.nodesource.com/node_16.x impish main

After that, a simple apt upgrade didn’t suffice. The nodejs upgrade was held back because of a dependency problem. Even an explicit upgrade of the nodejs package didn’t work:

$ sudo apt upgrade nodejs
Reading package lists... Done
Building dependency tree... Done
Reading state information... Done
Calculating upgrade... Done
Some packages could not be installed. This may mean that you have
requested an impossible situation or if you are using the unstable
distribution that some required packages have not yet been created
or been moved out of Incoming.
The following information may help to resolve the situation:

The following packages have unmet dependencies.
 libnode72 : Conflicts: nodejs-legacy
E: Broken packages

So, I resorted to a full apt dist-upgrade, which worked fine. After that, I reopened a Bash script and all was fine.

Related Images:

Opening Emacs (-client) windows with full screen height

I usually want my Emacs windows, including those opened via emacsclient, to be opened using the full screen height. It turns out that Emacs has a command line option for this:

emacs --fullheight

Now, for emacsclient this option doesn’t exist, so how can we solve this? Looking around the web, I found this answer on Emacs StackExchange that explained how to do this from within Emacs (see also the fullscreen option on the corresponding page in the Emacs manual). Combined with this answer on StackOverflow that shows how to use the -F/--frame-parameters option of emacsclient I managed to open a full-height Emacs client window:

emacsclient --create-frame --frame-parameters="'(fullscreen . fullheight)"

Most of the time I open new Emacs (-client) windows using the button in Ubuntu’s/Gnome shell’s dock. So how do we incorporate the aforementioned options in the relevant .desktop file? Before explaining how I did this, I have to mention that I don’t use a pre-packaged version of Emacs. As of this writing Emacs v27.2 is the latest official release, but I have been compiling Emacs from source for about two years now. About a month ago I compiled Emacs from the emacs-28 branch 1, which contains what will become Emacs v28. In this branch the .desktop files used by Gnome for its list of applications (including the icons/launchers that end up in the Gnome shell dock) have received some love. For example, the emacsclient.desktop file now opens a regular Emacs at first launch, but subsequent clicks on the icon will launch an Emacs client window. Right-clicking on the icon shows an option called “New Instance”, which will do as it says: launch a new Emacs instance. Well done Emacs maintainers! This perfectly fits my workflow, where most of the time I want to open a client window, but sometimes want to open a new Emacs instance (e.g. when I don’t want to clutter my regular workspaces).

So, getting back to the fullheight topic, editing the emacsclient.desktop file seemed like the way to go. Given that I compile Emacs from source and do not install it system-wide (I used the --prefix=/home/$USER/.local option when running ./configure), the .desktop files can be found in ~/.local/share/applications. This is the contents of the emacsclient.desktop file before I edited it:

[Desktop Entry]
Name=Emacs (Client)
GenericName=Text Editor
Comment=Edit text
MimeType=text/english;text/plain;text/x-makefile;text/x-c++hdr;text/x-c++src;text/x-chdr;text/x-csrc;text/x-java;text/x-moc;text/x-pascal;text/x-tcl;text/x-tex;application/x-shellscript;text/x-c;text/x-c++;
Exec=sh -c "if [ -n \\"\\$*\\" ]; then exec emacsclient --alternate-editor= --display=\\"\\$DISPLAY\\" \\"\\$@\\"; else exec emacsclient --alternate-editor= --create-frame; fi" %F
Icon=emacs
Type=Application
Terminal=false
Categories=Development;TextEditor;
StartupNotify=true
StartupWMClass=Emacs
Keywords=emacsclient;
Actions=new-window;new-instance;

[Desktop Action new-window]
Name=New Window
Exec=/home/lennart/.local/bin/emacsclient --alternate-editor= --create-frame %F

[Desktop Action new-instance]
Name=New Instance
Exec=emacs %F

After my edits, this is the contents of the file:

[Desktop Entry]
Name=Emacs (Client)
GenericName=Text Editor
Comment=Edit text
MimeType=text/english;text/plain;text/x-makefile;text/x-c++hdr;text/x-c++src;text/x-chdr;text/x-csrc;text/x-java;text/x-moc;text/x-pascal;text/x-tcl;text/x-tex;application/x-shellscript;text/x-c;text/x-c++;
Exec=sh -c "if [ -n \\"\\$*\\" ]; then exec emacsclient --alternate-editor=  --frame-parameters=\\"'(fullscreen . fullheight)\\" --display=\\"\\$DISPLAY\\" \\"\\$@\\"; else exec emacsclient --alternate-editor= --create-frame --frame-parameters=\\"'(fullscreen . fullheight)\\"; fi" %F
Icon=emacs
Type=Application
Terminal=false
Categories=Development;TextEditor;
StartupNotify=true
StartupWMClass=Emacs
Keywords=emacsclient;
Actions=new-window;new-instance;

[Desktop Action new-window]
Name=New Window
Exec=/home/lennart/.local/bin/emacsclient --alternate-editor= --create-frame --frame-parameters="'(fullscreen . fullheight)" %F

[Desktop Action new-instance]
Name=New Instance
Exec=emacs --fullheight %F

The diff is:

@@ -3,7 +3,7 @@
 GenericName=Text Editor
 Comment=Edit text
 MimeType=text/english;text/plain;text/x-makefile;text/x-c++hdr;text/x-c++src;text/x-chdr;text/x-csrc;text/x-java;text/x-moc;text/x-pascal;text/x-tcl;text/x-tex;application/x-shellscript;text/x-c;text/x-c++;
-Exec=sh -c "if [ -n \\"\\$*\\" ]; then exec emacsclient --alternate-editor= --display=\\"\\$DISPLAY\\" \\"\\$@\\"; else exec emacsclient --alternate-editor= --create-frame; fi" %F
+Exec=sh -c "if [ -n \\"\\$*\\" ]; then exec emacsclient --alternate-editor=  --frame-parameters=\\"'(fullscreen . fullheight)\\" --display=\\"\\$DISPLAY\\" \\"\\$@\\"; else exec emacsclient --alternate-editor= --create-frame --frame-parameters=\\"'(fullscreen . fullheight)\\"; fi" %F
 Icon=emacs
 Type=Application
 Terminal=false
@@ -15,8 +15,8 @@

 [Desktop Action new-window]
 Name=New Window
-Exec=/home/lennart/.local/bin/emacsclient --alternate-editor= --create-frame %F
+Exec=/home/lennart/.local/bin/emacsclient --alternate-editor= --create-frame --frame-parameters="'(fullscreen . fullheight)" %F

 [Desktop Action new-instance]
 Name=New Instance
-Exec=emacs %F
+Exec=emacs --fullheight %F

One final note: for those who don’t use the Emacs client, there is also the emacs.desktop file, with the same icon. You can find out which one is in your Gnome shell dock by running:

gsettings get org.gnome.shell favorite-apps

which returns a list like this:

['org.gnome.Terminal.desktop', 'thunderbird.desktop', 'firefox.desktop', 'emacsclient.desktop']

If you’d like to edit this variable manually, you can use either dconf-editor to edit org/gnome/shell/favorite-apps, or set it directly:

gsettings set org.gnome.shell favorite-apps "['org.gnome.Terminal.desktop', 'thunderbird.desktop', 'firefox.desktop', 'emacs.desktop']"

Note, the order of the list matters!

Footnotes:

1

The commit I used was d86b2e59c.

Related Images:

Use a script to convert Office files to PDF via Nautilus’ right-click menu

Recently, I bought a reMarkable 2, a tablet-like device with an e-ink screen that allows me to replace real paper with digital note taking, while keeping the hand-written aspect of writing notes. The device also allows me to read and annotate PDFs in a comfortable way. Given that I use RMfuse to ‘mount’ the reMarkable cloud on my computer, I normally drag-n-drop the files I want to read in GNOME Files (formerly Nautilus, GNOME’s file manager) from their location on my computer to the mounted cloud.

This works really well so far. However, I also regularly receive files in the MS Office .docx format. Often I need to make substantial changes in these documents, which I do on my laptop or computer. But sometimes I only need to read them or only put my signature at the bottom. For these cases I would open the .docx file in LibreOffice, convert it to PDF and copy it to my reMarkable. In order to speed this up, I thought it would be nice to have some way where I right-click on a .docx file in GNOME Files/Nautilus and then convert it to PDF automatically, after which I can drag-n-drop the PDF file to the mounted reMarkable cloud.

So the question was: how can I add an item to the right-click menu of Nautilus, which runs a script when I click on it. After looking around on the internet, this turned out to be quite easy. It turns out that scripts placed in ~/.local/share/nautilus/scripts/ end up in the Nautilus right-click menu under the Scripts submenu.

To do the actual conversion to PDF, I created the following script:

#!/bin/bash
# This script converts the selected file to PDF using LibreOffice
# For general instructions on how to use Nautilus scripts, see
# https://help.ubuntu.com/community/NautilusScriptsHowto
#
# Save this script in ~/.local/share/nautilus/scripts/ and make it
# executable.

IFS_BAK=$IFS
IFS="
"

for SelectedFile in ${NAUTILUS_SCRIPT_SELECTED_FILE_PATHS}; do
    soffice \
        --nodefault \
        --nolockcheck \
        --nologo \
        --norestore \
        --nofirststartwizard \
        --convert-to pdf "${SelectedFile}"
done

IFS=$IFS_BAK

Because I wanted to be able to select multiple files, some having spaces in their names, I had to make sure the space character wasn’t used to split the NAUTILUS_SCRIPT_SELECTED_FILE_PATHS variable. That is why I temporarily replace the IFS variable with a newline.

I have only tried this on .docx files so far, but I guess it would work on presentations and spreadsheets as well.

Related Images:

Using the Lenovo Thunderbolt 3 Essential Dock with Linux

Today the Lenovo Thunderbolt 3 Essential dock I had ordered just before the new year arrived. My current laptop is a 6th Gen Lenovo Thinkpad X1 Carbon, which actually has two Tunderbolt 3 (TB3) ports. For a while the cable mess on my desk had been bothering me and a dock looked like a good way to get rid of both the clutter and the fact that I had to plug in a power cable, an HDMI cable, a USB cable and a network cable. The latter was especially tricky, because my laptop doesn’t have a dedicated ethernet port, but instead has a dongle that plugs into one of the TB3 ports. Of course, I didn’t want it to happen that I was on the road without the dongle, so double checking and making sure I had it in my bag was a regular worry.

With the TB3 Essential dock all this should be over. The dock is pretty well equipped:

  • 1 ethernet port (1Gbps)
  • 1 HDMI 2.0 port
  • 1 DisplayPort 1.4
  • 2 USB A 3.0 1.5Gbps ports
  • 2 USB C 10Gbps ports (no video support)
  • 1 3.5 mm audio jack.

The one thing that remained to be seen, of course, was whether the all those ports would work under Linux as well. I read some promising reports for other TB3-based docks from Lenovo, so I decided to order it.

After connecting the various cables to the dock came the moment supreme: I plugged in the TB3 cable to the laptop. And… The display connected to the HDMI port lit up. So far, so good! No USB functionality, however. Time to dive into the BIOS, because I remembered having seen some settings there, including some security related ones.

In the BIOS I couldn’t change the TB3 security setting because, as the help message explained, the graphics memory was set to 512MB. I’m not sure why this is an issue, but I looked up the graphics RAM setting and reduced it to 256MB. Next, I went back to the TB settings and set the security level to the first option: “No security”, followed by a reboot. Now, everything worked. That is one step in the right direction.

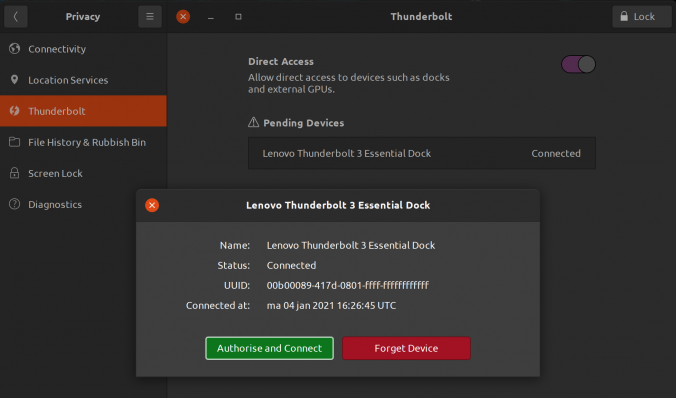
However, I wasn’t willing to forgo all security, so I went back to the BIOS settings and set the security level to “Secure Connection” (according to this blog post at dell.com this is security level 2 or SL2). I rebooted and indeed, no USB. So I went to Ubuntu’s Thunderbolt settings and there I had to press the ‘Unlock’ button in the top right corner, after which I could click on a button authorise the dock. After that all connections worked again. From the commandline, the boltctl utility can be used to see more information on the connected thunderbolt devices. This is the output for an unauthorised device:

$ boltctl list
? Lenovo Thunderbolt 3 Essential Dock
  ?? type:          peripheral
  ?? name:          Thunderbolt 3 Essential Dock
  ?? vendor:        Lenovo
  ?? uuid:          00b00089-417d-0801-ffff-ffffffffffff
  ?? status:        connected
  ?  ?? domain:     ca030000-0070-6f08-2382-4312b0238921
  ?  ?? authflags:  none
  ?? connected:     ma 04 jan 2021 16:26:45 UTC
  ?? stored:        ma 04 jan 2021 16:20:57 UTC
     ?? policy:     iommu
     ?? key:        no

And this is the output after clicking the “Authorise” button in the Ubuntu settings:

? boltctl list
? Lenovo Thunderbolt 3 Essential Dock
  ?? type:          peripheral
  ?? name:          Thunderbolt 3 Essential Dock
  ?? vendor:        Lenovo
  ?? uuid:          00b00089-417d-0801-ffff-ffffffffffff
  ?? status:        authorized
  ?  ?? domain:     ca030000-0070-6f08-2382-4312b0238921
  ?  ?? authflags:  none
  ?? authorized:    ma 04 jan 2021 16:30:07 UTC
  ?? connected:     ma 04 jan 2021 16:26:45 UTC
  ?? stored:        ma 04 jan 2021 16:20:57 UTC
     ?? policy:     iommu
     ?? key:        yes (new)

Nice!

However, my joy was shortlived, because after disconnecting and reconnecting the dock, the USB ports had stopped working again. The device had to be authorised again. This seemed tedious, so I set about reading more in the boltctl man page and found that there was a way to enroll a device permanently. So that is what I did. First I removed its UUID from the database:

$ boltctl forget 00b00089-417d-0801-ffff-ffffffffffff

And then added it again, this time with the auto policy:

$ boltctl enroll --policy auto 00b00089-417d-0801-ffff-ffffffffffff
 ? Lenovo Thunderbolt 3 Essential Dock
   ?? type:          peripheral
   ?? name:          Thunderbolt 3 Essential Dock
   ?? vendor:        Lenovo
   ?? uuid:          00b00089-417d-0801-ffff-ffffffffffff
   ?? dbus path:     /org/freedesktop/bolt/devices/00b00089_417d_0801_ffff_ffffffffffff
   ?? status:        authorized
   ?  ?? domain:     ca030000-0070-6f08-2382-4312b0238921
   ?  ?? parent:     ca030000-0070-6f08-2382-4312b0238921
   ?  ?? syspath:    /sys/devices/pci0000:00/0000:00:1d.0/0000:05:00.0/0000:06:00.0/0000:07:00.0/domain0/0-0/0-1
   ?  ?? authflags:  secure
   ?? authorized:    ma 04 jan 2021 22:33:08 UTC
   ?? connected:     ma 04 jan 2021 22:32:43 UTC
   ?? stored:        ma 04 jan 2021 16:20:57 UTC
      ?? policy:     auto
      ?? key:        yes

As you can see from the boltctl list output below, the policy is now set to auto (instead of the previous iommu):

$ boltctl list
 ? Lenovo Thunderbolt 3 Essential Dock
   ?? type:          peripheral
   ?? name:          Thunderbolt 3 Essential Dock
   ?? vendor:        Lenovo
   ?? uuid:          00b00089-417d-0801-ffff-ffffffffffff
   ?? status:        authorized
   ?  ?? domain:     ca030000-0070-6f08-2382-4312b0238921
   ?  ?? authflags:  secure
   ?? authorized:    ma 04 jan 2021 22:41:46 UTC
   ?? connected:     ma 04 jan 2021 22:41:45 UTC
   ?? stored:        ma 04 jan 2021 16:20:57 UTC
      ?? policy:     auto
      ?? key:        yes

Now I can disconnect and reconnect the dock without problems :-).

I also tested the 3.5mm audio port, which worked (at least for listening, I didn’t have a headset with microphone at hand). Same for the two USB A and the two USB C ports. Finally, I tested the DisplayPort and that worked too. In fact, connecting my 3440×1440 screen via both HDMI and DP to the dock worked fine. The Ubuntu display settings showed a “3 monitor” setup, two 3440×1440 screens and the latop’s own screen at 2560×1440.

So, in conclusion: the Lenovo Thunderbolt 3 Essential dock is fully supported under Ubuntu 20.04.

Thanks to this blog post at FunnelFiasco.com for pointing me to the boltctl utility!

Related Images:
Installing parted during Ubuntu installation

When installing Ubuntu (I guess a regular Debian installation won’t be any different), I sometimes would like to manually create or change partitions (by jumping to another terminal, e.g. using Alt-F2) before doing the actual install. My preferred tool for that is parted, however, on regular Ubuntu installation images (at least the server variety), parted isn’t available from the console by default.

Today I noticed that (at least on today’s daily image of Ubuntu 16.04 Xenial), a udeb file for parted is available. This is how you install it:

udpkg -i /cdrom/pool/main/p/parted/parted-udeb_3.2-15_amd64.udeb

after which you can use parted to your heart’s content.

For more information on udebs see the Debian Installer Internals documentation.

Related Images:

Setting the console font when using an nVidia card

Even though I do most of the work I do on my workstation in a graphical desktop environment, I sometimes want or need to switch to one of the virtual terminals (consoles), for example when trying to fix a connection problem or hanging desktop environment.

Whenever I had to do this I was always bothered by the fact that the font was so large (or, the other way around, the resolution so low). What made my annoyance worse was that I knew from my early Linux days So, instead of being annoyed I decided to fix this. Thanks to the help of mchid on unix.stackexchange.com I solved in a matter of minutes. The tricky part for me was to realise I am using an nVidia graphics card, which means things are just a little bit different than normally.

Just in case StackExchange ever goes down or this answer gets lost I will reproduce it below.

For newer Debian & Ubuntu distros using nvidia, I had to do the following: First, edit /etc/default/grub. Change the following line:

#GRUB_GFXMODE=640x480

to this:

GRUB_GFXMODE=1920x1200
GRUB_GFXPAYLOAD_LINUX=keep

replacing 1280×800 with the desired resolution.

Then:

echo "echo FRAMEBUFFER=y" | sudo tee /etc/initramfs-tools/conf.d/splash
sudo update-initramfs -u
sudo update-grub

To simply change the font size, you can do so using the following command:

sudo dpkg-reconfigure console-setup

Related Images:

Moving annual backups from an external disk with Ext4 to an external disk with ZFS

For a few years I have used the Christmas holidays to create a full
backup of my /home on an external hard disk. For that I used a
Bash script around rsync that uses hard links to keep the used disk
space under control. Each backup was saved in a directory named with
the date of the backup. POSIX ACLs were also backed up.

Since last year’s backup I have moved to ZFS (using ZFS on Linux
with Ubuntu 14.04
) as filesystem for /home (and others). Since ZFS
makes checksums of data and metadata it has the possibility to
detect corrupted files (and if the data is redundant it can also fix
them). This is a feature I’d like to have for my backups as
well: I’d rather know it when corruption occurs than live in
ignorance.

So the plan is to move the old backups from the external disk to the
ZFS pool in my server. and instead of using hard links I’ll transfer
the backups in order from old to new to the ZFS pool making a
snapshot for each. Additionally I will also turn on compression
(using the lz4 algorithm). Once that is done I will reformat the
external drive and create a ZFS pool called “JaarlijkseBackupPool” on
it (jaarlijks means annual in Dutch).

The old situation

In the current/old situation, this is how much disk space is used
on the external disk (with and without taking the hard links into
account):

$ sudo du -csh /mnt/JaarlijkseBackups/*
102G    /mnt/JaarlijkseBackups/2010-11-28
121G    /mnt/JaarlijkseBackups/2013-02-04
101G    /mnt/JaarlijkseBackups/2013-12-23
324G    total
$ sudo du -clsh /mnt/JaarlijkseBackups/*
102G    /mnt/JaarlijkseBackups/2010-11-28
193G    /mnt/JaarlijkseBackups/2013-02-04
255G    /mnt/JaarlijkseBackups/2013-12-23
549G    total

Copying the data from the Ext4 disk to a temporary ZFS filesystem on my server

The ZFS pool in my server is called storage. In order to save the
POSIX ACLs of the Ext4 system, they need to be enabled when
creating the ZFS filesystem as well. Setting xattr=sa means the
ACLS are stored more efficiently (although this option is not
compatible with other ZFS implementations at this time, so if I
would try to import the ZFS pool in FreeBSD for example, that
information would be inaccessible).

$ zfs create storage/JaarlijkseBackupsOrganized \
      -o compression=lz4 \
      -o acltype=posixacl \
      -o xattr=sa
$ sudo rsync -ahPAXHS --numeric-ids \
     /storage/JaarlijkseBackups/2010-11-28/ \
     /storage/JaarlijkseBackupsOrganized
$ zfs snapshot storage/JaarlijkseBackupsOrganized@2010-11-28

Followed by the same for the same rsync and zfs snapshot
commands for the other two dates.
Once that is finished, this is the status of that ZFS FS:

$ zfs list -r -t all storage/JaarlijkseBackupsOrganized
NAME                                            USED  AVAIL  REFER  MOUNTPOINT
storage/JaarlijkseBackupsOrganized              275G   438G   272G  /storage/JaarlijkseBackupsOrganized
storage/JaarlijkseBackupsOrganized@2010-11-28  1,03G      -  88,9G  -
storage/JaarlijkseBackupsOrganized@2013-02-04  2,33G      -   196G  -
storage/JaarlijkseBackupsOrganized@2013-12-23      0      -   272G  -
$ zfs get -r -t all compressratio storage/JaarlijkseBackupsOrganized
NAME                                           PROPERTY       VALUE  SOURCE
storage/JaarlijkseBackupsOrganized             compressratio  1.13x  -
storage/JaarlijkseBackupsOrganized@2010-11-28  compressratio  1.19x  -
storage/JaarlijkseBackupsOrganized@2013-02-04  compressratio  1.14x  -
storage/JaarlijkseBackupsOrganized@2013-12-23  compressratio  1.12x  -

Partitioning the external disk

The external disk is as 1TB Samsung SATA 3Gbps SpinPoint F2 EcoGreen disk
(type HD103SI, serial number: S1VSJD6ZB02657). The disk uses 512B
sectors:

sudo hdparm -I /dev/sdf |grep Sector
     Logical/Physical Sector size:           512 bytes

Before using it with ZFS, it needs to be partitioned. I used
parted:

$ parted /dev/sdf
GNU Parted 2.3
Using /dev/sdf
Welcome to GNU Parted! Type 'help' to view a list of commands.
(parted) p
Model: ATA SAMSUNG HD103SI (scsi)
Disk /dev/sdf: 1000GB
Sector size (logical/physical): 512B/512B
Partition Table: msdos

Number  Start   End     Size    Type     File system  Flags
 1      1049kB  1000GB  1000GB  primary  ext4

(parted) mklabel
New disk label type? gpt
(parted) u
Unit?  [compact]? MB
(parted) p
Model: ATA SAMSUNG HD103SI (scsi)
Disk /dev/sdf: 1000205MB
Sector size (logical/physical): 512B/512B
Partition Table: gpt

Number  Start  End  Size  File system  Name  Flags

(parted) mkpart
Partition name?  []? JaarlijkseBackups-HD103SI-S1VSJD6ZB02657
File system type?  [ext2]? zfs
Start? 1M
End? 1000204M
(parted) p
Model: ATA SAMSUNG HD103SI (scsi)
Disk /dev/sdf: 1000205MB
Sector size (logical/physical): 512B/512B
Partition Table: gpt

Number  Start   End        Size       File system  Name                                  Flags
 1      1,05MB  1000204MB  1000203MB  ext4         JaarlijkseBackups-HD103SI-S1VSJD6ZB0

(parted) q

This removes the old partition table and creates a new GPT
partition table (which allows naming partitions). Next I set the
units to MB so I can leave 1MB at the beginning and end of the
partition (can be helpful when importing this pool in
e.g. FreeBSD). The disk also shows up in /dev/disk/by=partlabel
now.

Creating the new ZFS pool

$ zpool create -o ashift=9 JaarlijkseBackupPool \
    /dev/disk/by-partlabel/JaarlijkseBackups-HD103SI-S1VSJD6ZB0
$ zpool status JaarlijkseBackupPool
  pool: JaarlijkseBackupPool
 state: ONLINE
  scan: none requested
config:

        NAME                                    STATE     READ WRITE CKSUM
        JaarlijkseBackupPool                    ONLINE       0     0     0
          JaarlijkseBackups-HD103SI-S1VSJD6ZB0  ONLINE       0     0     0

errors: No known data errors

Migrating the data

Now that the new ZFS pool and filesystem are all in place, it is
time to move the backups to the new place, starting with the oldest
backup. The -R option also make sure the attributes like
compression and xattr are transferred to the new FS. The
following commands send each snapshot to the new pool (the -n
option of zfs receive is for doing a dry run, just to show how it
works). After the first snapshot is sent, the other two are sent
using the -i option to zfs send so that only the incremental
differences between the snapshots are sent.

$ zfs send -vR storage/JaarlijkseBackupsOrganized@2010-11-28 | \
      zfs receive -Fvu JaarlijkseBackupPool/oldRsyncBackups
$ zfs send -vR -i storage/JaarlijkseBackupsOrganized@2010-11-28 \
    storage/JaarlijkseBackupsOrganized@2013-02-04 | \
    zfs receive -Fvu JaarlijkseBackupPool/oldRsyncBackups
$ zfs send -vR -i storage/JaarlijkseBackupsOrganized@2013-02-04 \
      storage/JaarlijkseBackupsOrganized@2013-12-23 | \
      zfs receive -Fvu JaarlijkseBackupPool/oldRsyncBackups -n
send from @2013-02-04 to storage/JaarlijkseBackupsOrganized@2013-12-23 estimated size is 84,3G
total estimated size is 84,3G
TIME        SENT   SNAPSHOT
would receive incremental stream of storage/JaarlijkseBackupsOrganized@2013-12-23 into JaarlijkseBackupPool@2013-12-23
14:09:16   4,22M   storage/JaarlijkseBackupsOrganized@2013-12-23
14:09:17   8,46M   storage/JaarlijkseBackupsOrganized@2013-12-23
14:09:18   18,4M   storage/JaarlijkseBackupsOrganized@2013-12-23
14:09:19   24,8M   storage/JaarlijkseBackupsOrganized@2013-12-23
^C
$ zfs send -vR -i  storage/JaarlijkseBackupsOrganized@2013-02-04 \
      storage/JaarlijkseBackupsOrganized@2013-12-23 | \
      zfs receive -Fvu JaarlijkseBackupPool/oldRsyncBackups

Add this year’s backup

At first I tried to add the new backups also to the
oldRsyncBackups FS, but that didn’t work (at least not with an
incremental backup), so I ended up making a new backup. The extra
cost in disk space is not a real problem. Disk space is rather
cheap and the current configuration will last me at least one more
year. So after creating a snapshot called 2014-12-26 of my
/home I ran:

   $ zfs send -v  storage/home@2014-12-26 | \
      zfs receive -Fu JaarlijkseBackupPool/home
$ zfs list -r -t all JaarlijkseBackupPool
NAME                                              USED  AVAIL  REFER  MOUNTPOINT
JaarlijkseBackupPool                              581G   332G    30K  /JaarlijkseBackupPool
JaarlijkseBackupPool/home                         311G   332G   311G  /JaarlijkseBackupPool/home
JaarlijkseBackupPool/home@2014-12-26             51,2M      -   311G  -
JaarlijkseBackupPool/oldRsyncBackups              271G   332G   267G  /JaarlijkseBackupPool/oldRsyncBackups
JaarlijkseBackupPool/oldRsyncBackups@2010-11-28   974M      -  87,1G  -
JaarlijkseBackupPool/oldRsyncBackups@2013-02-04  2,23G      -   193G  -
JaarlijkseBackupPool/oldRsyncBackups@2013-12-23      0      -   267G  -
$ zfs get -r compressratio JaarlijkseBackupPool
NAME                                             PROPERTY       VALUE  SOURCE
JaarlijkseBackupPool                             compressratio  1.15x  -
JaarlijkseBackupPool/home                        compressratio  1.17x  -
JaarlijkseBackupPool/home@2014-12-26             compressratio  1.17x  -
JaarlijkseBackupPool/oldRsyncBackups             compressratio  1.13x  -
JaarlijkseBackupPool/oldRsyncBackups@2010-11-28  compressratio  1.19x  -
JaarlijkseBackupPool/oldRsyncBackups@2013-02-04  compressratio  1.14x  -
JaarlijkseBackupPool/oldRsyncBackups@2013-12-23  compressratio  1.12x  -

Finishing up

In order to be able to disconnect the external drive without
damaging the filesystems use

zpool export JaarlijkseBackupPool

Later, the drive/pool can be imported using the zpool import
command.

Now that the migration is done, the intermediate filesystem
(including the snapshots) can also be removed:

zfs destroy -r storage/JaarlijkseBackupsOrganized

For reference: the old rsync script

#!/bin/sh
#
# Time-stamp: <2013-02-04 16:48:31 (root)>
# This scripts helps me create my annual backups to an external hard
# disk. The script uses rsync's hard link option to make hard links to
# the previous backups for files that haven't changed. It makes the
# backup based on an LVM snapshot it creates of the LV that contains
# the /home partition.
# This script needs to be run as root.
 
today=`date +%F`
olddate="2013-02-04"
 
srcdir="/mnt/backupsrc/"
destdir="/mnt/backupdest/JaarlijkseBackups/$today"
prevdir="/mnt/backupdest/JaarlijkseBackups/$olddate"
 
# LVM options
VG=raid5vg
LV=home
 
# rstnc options
options="-ahPAXHS --numeric-ids"
exclusions="--exclude 'lost+found/'"
#  --exclude '*/.thumbnails'"
# exclusions="$exclusions --exclude '*/.gvfs/'"
# exclusions="$exclusions --exclude '*/.cache/' --exclude '**/Cache'"
# exclusions="$exclusions --exclude '*/.recycle/'"
 
# Check to see if the previous backup directory exists
if [ ! -d $prevdir ]; then
    echo "Error: The directory with the previous back up ($prevdir) doesn't exist" 1>&2
    exit 1
fi
 
# Make a snapshot of the home LV that we can backup
lvcreate -L15G -s -n snap$LV /dev/$VG/$LV
mount /dev/$VG/snap$LV $srcdir
 
 
# Start the backup, first a dry-run, then the full one
rsynccommand="rsync $options $exclusions --link-dest=$prevdir $srcdir $destdir"
 
$rsynccommand -n
 
# Wait for user input
echo "This was a dry run. Press a key to continue with the real stuff or"
echo "hit Ctrl-c to abort."
read dummy
 
$rsynccommand

Related Images:

« Older posts

© 2024 Lennart's weblog

Theme by Anders NorénUp ↑