Notes about open source software, computers, other stuff.

Tag: LaTeX

Hiding columns in LaTeX export of org-mode tables

Today I was working on an Emacs org-mode document that I wanted to export to PDF. The document contained several tables and for the PDF export I wanted to hide one of the columns in the table. Of course I could have removed the column in the org source, but since I might need it in the future that wasn’t really an option.

Searching the internet I came across this e-mail discussion on the org-mode mailing list, where radio tables were suggested. I briefly tried to get that working, but it seems that this is more of an option if you are working in e.g. a LaTeX document and want to use org-style formatted tables.

So I tried another search, this time on how to hide columns in LaTeX, having the idea in mind that I could then use that to fix the org-mode export. Thanks to question on tex.stackexchange.com I came up with the followin solution:

First add the following lines at the top of the org file, after the regular org-mode header (if you have one):

#+LATEX_HEADER: \usepackage{array}
#+LATEX_HEADER: \newcolumntype{H}{>{\setbox0=\hbox\bgroup}c<{\egroup}@{}}

This defines a new column type with the name H (for ‘hidden’). Next, just before the table, simply add an #+ATTR_LATEX: attribute (see the org-mode manual):

#+ATTR_LATEX: :align lHl
| col 1 | to be hidden | col3   |
|-------+--------------+--------|
|     1 | secret       | info 1 |
|     2 | private      | info 2 |
|     3 | hidden       | info 3 |

When you export this to PDF (via C-c C-e lo) the table in the PDF only contains the first and last column.

Related Images:

How to start a LaTeX enumerate environment with a different number

I keep forgetting how to do this, so here’s a quick post that shows how to start a LaTeX enumerate environment with a different number.

By default enumerate environments start counting from 1 (obviously). To start with a different number you simply need to change the value of a counter:

\begin{enumerate}
   \setcounter{enumi}{2}
   \item This will be item 3
   \item Item 4 will be here
\end{enumerate}

If you have nested enumerate environments, the counters are enumii and enumiii.

Related Images:

Using BibTeX from org-mode

I use Emacsorg-mode a lot for writing notes, todo lists, presentations and writing short reports. Recently I started writing a larger report which I normally would have done in LaTeX. This time, since the notes related to the project were already in org format, I decided to write the whole report in org-mode. The one thing I needed for that was using BibTeX bibliographies (and RefTeX) from org-mode. A quick web search revealed that that can easily be done by adding the following to your .emacs file:

;; Configure RefTeX for use with org-mode. At the end of your
;; org-mode file you need to insert your style and bib file:
;; \bibliographystyle{plain}
;; \bibliography{ProbePosition}
;; See http://www.mfasold.net/blog/2009/02/using-emacs-org-mode-to-draft-papers/
(defun org-mode-reftex-setup ()
  (load-library "reftex")
  (and (buffer-file-name)
       (file-exists-p (buffer-file-name))
       (reftex-parse-all))
  (define-key org-mode-map (kbd "C-c )") 'reftex-citation)
  )
(add-hook 'org-mode-hook 'org-mode-reftex-setup)

After that, RefTeX works, but exporting the org document to PDF (via LaTeX) didn’t include the bibliography entries. A quick look at the error log showed that bibtex hadn’t been run, so the question was: how to tell org-mode to do that too when exporting. The answer is to tell org-mode to use the latexmk Perl script (on Debian/Ubuntu it is easily installed from the package repositories) when exporting to PDF. I added the following lines to my .emacs file:

;; Use latexmk for PDF export
(setq org-latex-to-pdf-process (list "latexmk -pdf -bibtex %f"))

Related Images:

Ubuntu 12.04: LaTeX siunitx package and the correct font in beamer

When writing scientific text I normally use the siunitx package to typeset numbers (using \num{}) and numbers with units (e.g. \SI{4.0}{TB}) in LaTeX.
Something that bothered me for a while was the fact that when making presentations in Beamer, numbers and units would be typeset in a serif font, whereas beamer uses sans-serif fonts.
The solution is actually documented in the manual, but what to me a while to figure out was that in Ubuntu 12.04 (and therefore in Debian as well, I presume) the version of the siunitx package is lagging compared to what is available on CTAN. Ubuntu 12.04 still has version 1.3a of the siunitx package, which was released in September 2009. For this version the solution is to add the following to the preamble of your document:

\sisetup{obeyfamily=false,mathrm=mathsf,textrm=sffamily}

Related Images:

RefTeX, how could I have missed this?

I’ve been using Emacs and LaTeX for more than ten years now and still I keep learning. For example, last Friday I came across Stephen Eglen’s ESS (Emacs Speaks Statistics) tutorial. In his slides he mentioned RefTeX. I had heard of it before, but for some reason I thought it was either a set of LaTeX styles or an AUCTeX replacement and consequently, I never looked into it.

This time, however, I made the small effort of looking up RefTeX’s website and lo and behold, it’s neither of the two things I thought it was. Instead, it is an extension to LaTeX that makes inserting citation, references, index entries and labels a breeze. Even if you don’t (want to) use all its capabilities, the following keystrokes are worth the effort:

C-c = Show table of contents of the document (also a great way to walk through your document)

C-c ( Insert a label at point
C-c ) Insert a reference to some label
C-c [ Search in your bibliography (either BibTeX or thebibliography environment) to insert citations

To start using RefTeX in a document you are already editing simple run

M-x reftex-mode

Insert the following in .emacs file if you want to load RefTeX on startup

;; Enable RefTeX
(add-hook 'LaTeX-mode-hook 'turn-on-reftex)   ; with AUCTeX LaTeX mode
(add-hook 'latex-mode-hook 'turn-on-reftex)   ; with Emacs latex mode

Related Images:

A LaTeX example environment

Edit: Since the LaTeX beamer class already contains an example environment I renamed mine to latexample

During my stay at the National University of Rwanda I gave a LaTeX course to the Master’s students of the department of mathematics. For this course I wrote my own lecture notes (which I will put up on the web some other time), and already quite early in the process I found out I wanted an environment or something similar that would allow me to split the page in two and display some LaTeX code in the first column and the resulting output in the second column. It took me some time to figure it out (and it’s far from perfect and/or fool-proof), but it does the trick for most simple examples I wanted to show.

So, without further ado, here’s the code:

1
2
3
4
5
6
7
8
9
10
11
12
13
14
15
16
17
18
19
20
21
22
23
24
25
26
27
\usepackage[dvipsnames,pdftex]{xcolor}
\definecolor{lstbgcolor}{rgb}{0.9,0.9,0.9} 
 
\usepackage{listings}
\lstloadlanguages{[LaTeX]TeX}
 
\usepackage{fancyvrb}
 
\newenvironment{latexample}[1][language={[LaTeX]TeX}]
{\lstset{backgroundcolor=\color{lstbgcolor},
    keywordstyle=\color[rgb]{0,0,1},
    commentstyle=\color[rgb]{0.133,0.545,0.133},
    stringstyle=\color[rgb]{0.627,0.126,0.941},
    breaklines=true,
    prebreak = \raisebox{0ex}[0ex][0ex]{\ensuremath{\hookleftarrow}},
    frame=single,
    language={[LaTeX]TeX},
    basicstyle=\footnotesize\ttfamily, #1}
  \VerbatimEnvironment\begin{VerbatimOut}{latexample.verb.out}}
  {\end{VerbatimOut}\noindent
  \begin{minipage}{0.5\linewidth}
    \lstinputlisting[]{latexample.verb.out}%
  \end{minipage}\qquad
  \begin{minipage}{0.4\linewidth}
    \input{latexample.verb.out}
  \end{minipage}\\
}

In the first seven lines the necessary packages are loaded, the other lines make up the definition of the environment. In line 9 the environment is given its name and we define one argument. In lines 10 to 18 we define the options for the listing environment. Then, in line 19 we use \VerbatimEnvironment followed by the VerbatimOut environment from the fancyvrb package to write everything that’s inside the environment into a file called latexample.verb.out. This concludes the actions that are done at the opening of the example environment. When the example environment is closed lines 20 to 26 are executed. The VerbatimOut is closed and then we start setting up to minipages. The left one contains the text we put into the example environment as an lstlisting read from the latexample.verb.out file (line 22), the right one contains the rendered text by using LaTeX’s \input command (line 25).

This is what it looks like:
latexexample-table.png
This example was made with the following code:

1
2
3
4
5
6
7
8
9
10
11
12
13
14
15
16
17
18
\begin{verbatim}
\begin{latexample}
  ... LaTeX code here ...
\end{latexample}
\end{verbatim}
 
A simple demonstration of the \verb|tabular| environment can be given like this:
\begin{latexample}[]
\begin{tabular}{|c|c|c|}
  \hline
  \multicolumn{3}{|c|}{AAA} \\
  \hline
  123 & \multicolumn{2}{c|}{456}\\
  \hline
  BBB & CCC & DDD \\
  \hline
\end{tabular}
\end{latexample}

In the first seven lines the necessary packages are loaded, the other lines make up the definition of the environment. In line 9 the environment is given its name and we define one argument. In lines 10 to 18 we define the options for the listing environment. Then, in line 19 we use \VerbatimEnvironment followed by the VerbatimOut environment from the fancyvrb package to write everything that’s inside the environment into a file called latexample.verb.out. This concludes that actions that are done before the text is rendered. When the environment is closed lines 20 to 26 are executed. The VerbatimOut is closed and then we start setting up to minipages. The left one contains the text we put into the example environment as an lstlisting read from the latexample.verb.out file (line 22), the right one contains the rendered text by using LaTeX’s \input command (line 25).

The environment accepts an optional argument. This argument can be one or more options that are passed on to the <>lstset option list for the lstlisting environment. By default it is set to language={[LaTeX]TeX}. For some reason that I haven’t been able to identify yet, the argument must be given, even if empty (see the example above, which starts the evironment with \begin{latexample}[]. The two [] give the empty option list. This is the reason why in line 17 of the definition we set language={[LaTeX]TeX}, even though I also did this in the environment definition in line 9. I wanted to make the argument optional, but haven’t gotten it to work that way.

So, as mentioned earlier, this environment is far from perfect. Things that involve counters (like \chapter and other sectioning commands, but also numbered equations and figures) don’t work in the sense that the numbering in the example is not separate from the rest of the document. So if you put a numbered equation in the example the equations following the example will have their numbers increased by one. I’m working on a slightly more complex definition of the latexample environment that closes that bug.

Related Images:

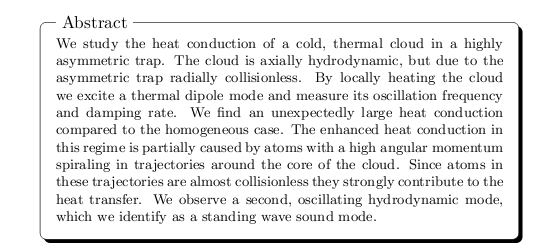
Using tikz to generate an abstract box in LaTeX

LaTeX is a document preparation system that I used for most texts I’ve written since my Master’s thesis, the largest project being my PhD thesis.

Recently a friend of mine asked me if I could help him creating a boxed abstract. Normally a \framebox{} would have done the trick, but he wanted the word “Abstract” in the top left corner of the box. I tried a few variations on his start, but in the end I realised I could try my newly developped tikz skills on it. Together with Google I came up with the following solution that loads the tikz package and then defines the \boxabstract{} command.

1
2
3
4
5
6
7
8
9
10
11
12
13
14
15
16
17
18
19
  \usepackage{tikz}
  \usetikzlibrary{shapes,shadows}
  \tikzstyle{abstractbox} = [draw=black, fill=white, rectangle, 
  inner sep=10pt, style=rounded corners, drop shadow={fill=black,
  opacity=1}]
  \tikzstyle{abstracttitle} =[fill=white]
 
  \newcommand{\boxabstract}[2][fill=white]{
    \begin{center}
      \begin{tikzpicture}
        \node [abstractbox, #1] (box)
        {\begin{minipage}{0.80\linewidth}
%            \setlength{\parindent}{2mm}
            \footnotesize #2
          \end{minipage}};
        \node[abstracttitle, right=10pt] at (box.north west) {Abstract};
      \end{tikzpicture}
    \end{center}
  }

The resulting PDF looks like this:

Note that since the actual text is set in a minipage normal indentation is not set. This can be circumvented by uncommenting the line that sets the \parindent.

Related Images:

© 2025 Lennart's weblog

Theme by Anders NorĂ©nUp ↑