Notes about open source software, computers, other stuff.

Author: LCK (Page 2 of 14)

A bioinfomatician on the move...

Upgrading nodejs to the latest LTS release on Ubuntu 21.10

Today I upgraded the Bash language server (to v3.0.3), after which I noticed that it stopped working. When loading a .bash file, the language server didn’t load and told me to look in the error output for more information. In Emacs, the errors of the Bash language server can be found in the *bash-ls::stderr* buffer, which showed me:

/home/lennart/.emacs.d/.cache/lsp/npm/bash-language-server/lib/node_modules/bash-language-server/node_modules/vscode-jsonrpc/lib/common/linkedMap.js:40
        return this._head?.value;
                          ^

SyntaxError: Unexpected token '.'
    at wrapSafe (internal/modules/cjs/loader.js:915:16)
    at Module._compile (internal/modules/cjs/loader.js:963:27)
    at Object.Module._extensions..js (internal/modules/cjs/loader.js:1027:10)
    at Module.load (internal/modules/cjs/loader.js:863:32)
    at Function.Module._load (internal/modules/cjs/loader.js:708:14)
    at Module.require (internal/modules/cjs/loader.js:887:19)
    at require (internal/modules/cjs/helpers.js:74:18)
    at Object.<anonymous> (/home/lennart/.emacs.d/.cache/lsp/npm/bash-language-server/lib/node_modules/bash-language-server/node_modules/vscode-jsonrpc/lib/common/api.js:37:21)
    at Module._compile (internal/modules/cjs/loader.js:999:30)
    at Object.Module._extensions..js (internal/modules/cjs/loader.js:1027:10)

I re-ran lsp-install-server, which pointed out that I had nodejs v12.22.5 installed and the language server required v14 or higher.

Time to figure out how to install a newer nodejs version on my Ubuntu 21.10 machine. It turns out that v12 is no longer maintained. The current LTS version of nodejs is v16. Here I found instructions on how to install a given version of nodejs on Ubuntu. For v16, this boils down to running

curl -sL https://deb.nodesource.com/setup_16.x | sudo bash -

The script that this command fetches (and executes as root) is quite elaborate, but in the end it simply creates the file /etc/apt/sources.list.d/nodesource.list, with the following contents:

deb [signed-by=/usr/share/keyrings/nodesource.gpg] https://deb.nodesource.com/node_16.x impish main
deb-src [signed-by=/usr/share/keyrings/nodesource.gpg] https://deb.nodesource.com/node_16.x impish main

After that, a simple apt upgrade didn’t suffice. The nodejs upgrade was held back because of a dependency problem. Even an explicit upgrade of the nodejs package didn’t work:

$ sudo apt upgrade nodejs
Reading package lists... Done
Building dependency tree... Done
Reading state information... Done
Calculating upgrade... Done
Some packages could not be installed. This may mean that you have
requested an impossible situation or if you are using the unstable
distribution that some required packages have not yet been created
or been moved out of Incoming.
The following information may help to resolve the situation:

The following packages have unmet dependencies.
 libnode72 : Conflicts: nodejs-legacy
E: Broken packages

So, I resorted to a full apt dist-upgrade, which worked fine. After that, I reopened a Bash script and all was fine.

Related Images:

Getting SMART information from a Seagate Expansion Portable drive

A couple of days ago, I bought myself a 5TB Seagate Expansion Portable drive. This is an 2.5″ external spinning hard disk that connects over USB. In a review on a well-known Dutch website for IT enthusiasts, I read that inside, the drive consists of an ST5000LM000 hard drive and a USB to SATA chip (in contrast to other manufacturers like WD that solder the USB connector directly on the drives circuit board).

After connecting the drive to my computer (that currently runs Ubuntu 21.10), I wanted to see what I could learn about the drive in terms of SMART information. So I tried:

$ sudo smartctl -a /dev/sda
smartctl 7.2 2020-12-30 r5155 [x86_64-linux-5.13.0-41-generic] (local build)
Copyright (C) 2002-20, Bruce Allen, Christian Franke, www.smartmontools.org

Read Device Identity failed: scsi error unsupported field in scsi command

A mandatory SMART command failed: exiting. To continue, add one or more '-T permissive' options.

Trying the suggested -T option didn’t help. So I played around with the -d option that I had used before trying to connect to hard drives behind RAID controllers. That looked better:

$ sudo smartctl -a /dev/sda -T conservative -d sat,auto
smartctl 7.2 2020-12-30 r5155 [x86_64-linux-5.13.0-41-generic] (local build)
Copyright (C) 2002-20, Bruce Allen, Christian Franke, www.smartmontools.org

=== START OF INFORMATION SECTION ===
Vendor:               Seagate
Product:              Expansion HDD
Revision:             1901
Compliance:           SPC-4
User Capacity:        5.000.981.077.504 bytes [5,00 TB]
Logical block size:   512 bytes
Physical block size:  4096 bytes
LU is fully provisioned
Logical Unit id:      0x3e41434334313346
Serial number:        00000000NACC413F
Device type:          disk
Local Time is:        Thu May 19 21:54:04 2022 CEST
SMART support is:     Unavailable - device lacks SMART capability.

=== START OF READ SMART DATA SECTION ===
Current Drive Temperature:     0 C
Drive Trip Temperature:        0 C

Error Counter logging not supported

No Self-tests have been logged

The drive reports the correct size, but also says there is not SMART support. In fact, using -d scsi gave identical output. Because there should only be this USB to SATA translation layer I thought that somehow I should be able to get the SMART commands to work. Looking through the smartmontools website, I came across this article that explains the “SAT with UAS” situation. It seems that the high speed UAS driver disables SAT transfers in certain cases. The workaround is to tell the kernel to use the older usb-storage driver instead of the uas driver. With the lsusb command I identified the manufacturer and device ID of the drive:

$ lsusb | grep -i seagate
Bus 004 Device 012: ID 0bc2:2037 Seagate RSS LLC Expansion HDD

Next, I made sure to unmount and disconnect the drive and then instructed the kernel to use the old driver for this device:

$ echo "0x0bc2:0x2037:u" | sudo tee /sys/module/usb_storage/parameters/quirks

and reconnected the drive. I verified in the kernel logs that the usb-storage driver was indeed used:

mei 19 22:08:30 barabas kernel: usb 4-3.3: new SuperSpeed USB device number 12 using xhci_hcd
mei 19 22:08:30 barabas mtp-probe[983206]: checking bus 4, device 12: "/sys/devices/pci0000:00/0000:00:08.1/0000:0c:00.3/usb4/4-3/4-3.3"
mei 19 22:08:30 barabas mtp-probe[983206]: bus: 4, device: 12 was not an MTP device
mei 19 22:08:30 barabas kernel: usb 4-3.3: New USB device found, idVendor=0bc2, idProduct=2037, bcdDevice=19.01
mei 19 22:08:30 barabas kernel: usb 4-3.3: New USB device strings: Mfr=1, Product=2, SerialNumber=3
mei 19 22:08:30 barabas kernel: usb 4-3.3: Product: Expansion HDD
mei 19 22:08:30 barabas kernel: usb 4-3.3: Manufacturer: Seagate
mei 19 22:08:30 barabas kernel: usb 4-3.3: SerialNumber: 00000000NACC413F
mei 19 22:08:30 barabas kernel: usb 4-3.3: UAS is ignored for this device, using usb-storage instead
mei 19 22:08:30 barabas kernel: usb-storage 4-3.3:1.0: USB Mass Storage device detected
mei 19 22:08:30 barabas kernel: usb-storage 4-3.3:1.0: Quirks match for vid 0bc2 pid 2037: 800000
mei 19 22:08:30 barabas kernel: scsi host6: usb-storage 4-3.3:1.0

Notice the “UAS is ignored” message. And lo and behold, smartctl now works and shows all relevant information:

$ sudo smartctl -a /dev/sda
smartctl 7.2 2020-12-30 r5155 [x86_64-linux-5.13.0-41-generic] (local build)
Copyright (C) 2002-20, Bruce Allen, Christian Franke, www.smartmontools.org

=== START OF INFORMATION SECTION ===
Model Family:     Seagate Barracuda 2.5 5400
Device Model:     ST5000LM000-2U8170
Serial Number:    WCJ6AG24
LU WWN Device Id: 5 000c50 0e0939684
Firmware Version: 0001
User Capacity:    5.000.981.078.016 bytes [5,00 TB]
Sector Sizes:     512 bytes logical, 4096 bytes physical
Rotation Rate:    5400 rpm
Form Factor:      2.5 inches
Device is:        In smartctl database [for details use: -P show]
ATA Version is:   ACS-3 T13/2161-D revision 3b
SATA Version is:  SATA 3.1, 6.0 Gb/s (current: 6.0 Gb/s)
Local Time is:    Thu May 19 22:30:52 2022 CEST
SMART support is: Available - device has SMART capability.
SMART support is: Enabled

=== START OF READ SMART DATA SECTION ===
SMART overall-health self-assessment test result: PASSED

General SMART Values:
Offline data collection status:  (0x00)	Offline data collection activity
					was never started.
					Auto Offline Data Collection: Disabled.
Self-test execution status:      (   0)	The previous self-test routine completed
					without error or no self-test has ever
					been run.
Total time to complete Offline
data collection: 		(    0) seconds.
Offline data collection
capabilities: 			 (0x71) SMART execute Offline immediate.
					No Auto Offline data collection support.
					Suspend Offline collection upon new
					command.
					No Offline surface scan supported.
					Self-test supported.
					Conveyance Self-test supported.
					Selective Self-test supported.
SMART capabilities:            (0x0003)	Saves SMART data before entering
					power-saving mode.
					Supports SMART auto save timer.
Error logging capability:        (0x01)	Error logging supported.
					General Purpose Logging supported.
Short self-test routine
recommended polling time: 	 (   1) minutes.
Extended self-test routine
recommended polling time: 	 ( 827) minutes.
Conveyance self-test routine
recommended polling time: 	 (   2) minutes.
SCT capabilities: 	       (0x7035)	SCT Status supported.
					SCT Feature Control supported.
					SCT Data Table supported.

SMART Attributes Data Structure revision number: 10
Vendor Specific SMART Attributes with Thresholds:
ID# ATTRIBUTE_NAME          FLAG     VALUE WORST THRESH TYPE      UPDATED  WHEN_FAILED RAW_VALUE
  1 Raw_Read_Error_Rate     0x000f   067   065   006    Pre-fail  Always       -       5367808
  3 Spin_Up_Time            0x0003   100   100   000    Pre-fail  Always       -       0
  4 Start_Stop_Count        0x0032   100   100   020    Old_age   Always       -       10
  5 Reallocated_Sector_Ct   0x0033   100   100   036    Pre-fail  Always       -       0
  7 Seek_Error_Rate         0x000f   100   253   045    Pre-fail  Always       -       3765
  9 Power_On_Hours          0x0032   100   100   000    Old_age   Always       -       0 (86 255 0)
 10 Spin_Retry_Count        0x0013   100   100   097    Pre-fail  Always       -       0
 12 Power_Cycle_Count       0x0032   100   100   020    Old_age   Always       -       9
184 End-to-End_Error        0x0032   100   100   099    Old_age   Always       -       0
187 Reported_Uncorrect      0x0032   100   100   000    Old_age   Always       -       0
188 Command_Timeout         0x0032   100   100   000    Old_age   Always       -       0
189 High_Fly_Writes         0x003a   100   100   000    Old_age   Always       -       0
190 Airflow_Temperature_Cel 0x0022   069   069   040    Old_age   Always       -       31 (Min/Max 29/31)
191 G-Sense_Error_Rate      0x0032   100   100   000    Old_age   Always       -       0
192 Power-Off_Retract_Count 0x0032   100   100   000    Old_age   Always       -       2
193 Load_Cycle_Count        0x0032   100   100   000    Old_age   Always       -       23
194 Temperature_Celsius     0x0022   031   040   000    Old_age   Always       -       31 (0 19 0 0 0)
197 Current_Pending_Sector  0x0012   100   100   000    Old_age   Always       -       0
198 Offline_Uncorrectable   0x0010   100   100   000    Old_age   Offline      -       0
199 UDMA_CRC_Error_Count    0x003e   200   200   000    Old_age   Always       -       0
240 Head_Flying_Hours       0x0000   100   253   000    Old_age   Offline      -       0 (7 164 0)
241 Total_LBAs_Written      0x0000   100   253   000    Old_age   Offline      -       1723222
242 Total_LBAs_Read         0x0000   100   253   000    Old_age   Offline      -       3644586

SMART Error Log Version: 1
No Errors Logged

SMART Self-test log structure revision number 1
No self-tests have been logged.  [To run self-tests, use: smartctl -t]

SMART Selective self-test log data structure revision number 1
 SPAN  MIN_LBA  MAX_LBA  CURRENT_TEST_STATUS
    1        0        0  Not_testing
    2        0        0  Not_testing
    3        0        0  Not_testing
    4        0        0  Not_testing
    5        0        0  Not_testing
Selective self-test flags (0x0):
  After scanning selected spans, do NOT read-scan remainder of disk.
If Selective self-test is pending on power-up, resume after 0 minute delay.

Now that I know how to do this, let’s undo the “use usb-storage driver instead of the uas driver” (alternatively, a reboot should also work, but who wants that?):

$ echo "" | sudo tee /sys/module/usb_storage/parameters/quirks

I will use this drive as a backup drive while I am travelling, so the aim of this post is not only to inform you as my reader(s), but also to remind my future self of how I did this. Now I only need to remember to check the SMART values every once in a while :-).

Related Images:

Opening Emacs (-client) windows with full screen height

I usually want my Emacs windows, including those opened via emacsclient, to be opened using the full screen height. It turns out that Emacs has a command line option for this:

emacs --fullheight

Now, for emacsclient this option doesn’t exist, so how can we solve this? Looking around the web, I found this answer on Emacs StackExchange that explained how to do this from within Emacs (see also the fullscreen option on the corresponding page in the Emacs manual). Combined with this answer on StackOverflow that shows how to use the -F/--frame-parameters option of emacsclient I managed to open a full-height Emacs client window:

emacsclient --create-frame --frame-parameters="'(fullscreen . fullheight)"

Most of the time I open new Emacs (-client) windows using the button in Ubuntu’s/Gnome shell’s dock. So how do we incorporate the aforementioned options in the relevant .desktop file? Before explaining how I did this, I have to mention that I don’t use a pre-packaged version of Emacs. As of this writing Emacs v27.2 is the latest official release, but I have been compiling Emacs from source for about two years now. About a month ago I compiled Emacs from the emacs-28 branch 1, which contains what will become Emacs v28. In this branch the .desktop files used by Gnome for its list of applications (including the icons/launchers that end up in the Gnome shell dock) have received some love. For example, the emacsclient.desktop file now opens a regular Emacs at first launch, but subsequent clicks on the icon will launch an Emacs client window. Right-clicking on the icon shows an option called “New Instance”, which will do as it says: launch a new Emacs instance. Well done Emacs maintainers! This perfectly fits my workflow, where most of the time I want to open a client window, but sometimes want to open a new Emacs instance (e.g. when I don’t want to clutter my regular workspaces).

So, getting back to the fullheight topic, editing the emacsclient.desktop file seemed like the way to go. Given that I compile Emacs from source and do not install it system-wide (I used the --prefix=/home/$USER/.local option when running ./configure), the .desktop files can be found in ~/.local/share/applications. This is the contents of the emacsclient.desktop file before I edited it:

[Desktop Entry]
Name=Emacs (Client)
GenericName=Text Editor
Comment=Edit text
MimeType=text/english;text/plain;text/x-makefile;text/x-c++hdr;text/x-c++src;text/x-chdr;text/x-csrc;text/x-java;text/x-moc;text/x-pascal;text/x-tcl;text/x-tex;application/x-shellscript;text/x-c;text/x-c++;
Exec=sh -c "if [ -n \\"\\$*\\" ]; then exec emacsclient --alternate-editor= --display=\\"\\$DISPLAY\\" \\"\\$@\\"; else exec emacsclient --alternate-editor= --create-frame; fi" %F
Icon=emacs
Type=Application
Terminal=false
Categories=Development;TextEditor;
StartupNotify=true
StartupWMClass=Emacs
Keywords=emacsclient;
Actions=new-window;new-instance;

[Desktop Action new-window]
Name=New Window
Exec=/home/lennart/.local/bin/emacsclient --alternate-editor= --create-frame %F

[Desktop Action new-instance]
Name=New Instance
Exec=emacs %F

After my edits, this is the contents of the file:

[Desktop Entry]
Name=Emacs (Client)
GenericName=Text Editor
Comment=Edit text
MimeType=text/english;text/plain;text/x-makefile;text/x-c++hdr;text/x-c++src;text/x-chdr;text/x-csrc;text/x-java;text/x-moc;text/x-pascal;text/x-tcl;text/x-tex;application/x-shellscript;text/x-c;text/x-c++;
Exec=sh -c "if [ -n \\"\\$*\\" ]; then exec emacsclient --alternate-editor=  --frame-parameters=\\"'(fullscreen . fullheight)\\" --display=\\"\\$DISPLAY\\" \\"\\$@\\"; else exec emacsclient --alternate-editor= --create-frame --frame-parameters=\\"'(fullscreen . fullheight)\\"; fi" %F
Icon=emacs
Type=Application
Terminal=false
Categories=Development;TextEditor;
StartupNotify=true
StartupWMClass=Emacs
Keywords=emacsclient;
Actions=new-window;new-instance;

[Desktop Action new-window]
Name=New Window
Exec=/home/lennart/.local/bin/emacsclient --alternate-editor= --create-frame --frame-parameters="'(fullscreen . fullheight)" %F

[Desktop Action new-instance]
Name=New Instance
Exec=emacs --fullheight %F

The diff is:

@@ -3,7 +3,7 @@
 GenericName=Text Editor
 Comment=Edit text
 MimeType=text/english;text/plain;text/x-makefile;text/x-c++hdr;text/x-c++src;text/x-chdr;text/x-csrc;text/x-java;text/x-moc;text/x-pascal;text/x-tcl;text/x-tex;application/x-shellscript;text/x-c;text/x-c++;
-Exec=sh -c "if [ -n \\"\\$*\\" ]; then exec emacsclient --alternate-editor= --display=\\"\\$DISPLAY\\" \\"\\$@\\"; else exec emacsclient --alternate-editor= --create-frame; fi" %F
+Exec=sh -c "if [ -n \\"\\$*\\" ]; then exec emacsclient --alternate-editor=  --frame-parameters=\\"'(fullscreen . fullheight)\\" --display=\\"\\$DISPLAY\\" \\"\\$@\\"; else exec emacsclient --alternate-editor= --create-frame --frame-parameters=\\"'(fullscreen . fullheight)\\"; fi" %F
 Icon=emacs
 Type=Application
 Terminal=false
@@ -15,8 +15,8 @@

 [Desktop Action new-window]
 Name=New Window
-Exec=/home/lennart/.local/bin/emacsclient --alternate-editor= --create-frame %F
+Exec=/home/lennart/.local/bin/emacsclient --alternate-editor= --create-frame --frame-parameters="'(fullscreen . fullheight)" %F

 [Desktop Action new-instance]
 Name=New Instance
-Exec=emacs %F
+Exec=emacs --fullheight %F

One final note: for those who don’t use the Emacs client, there is also the emacs.desktop file, with the same icon. You can find out which one is in your Gnome shell dock by running:

gsettings get org.gnome.shell favorite-apps

which returns a list like this:

['org.gnome.Terminal.desktop', 'thunderbird.desktop', 'firefox.desktop', 'emacsclient.desktop']

If you’d like to edit this variable manually, you can use either dconf-editor to edit org/gnome/shell/favorite-apps, or set it directly:

gsettings set org.gnome.shell favorite-apps "['org.gnome.Terminal.desktop', 'thunderbird.desktop', 'firefox.desktop', 'emacs.desktop']"

Note, the order of the list matters!

Footnotes:

1

The commit I used was d86b2e59c.

Related Images:

Use a script to convert Office files to PDF via Nautilus’ right-click menu

Recently, I bought a reMarkable 2, a tablet-like device with an e-ink screen that allows me to replace real paper with digital note taking, while keeping the hand-written aspect of writing notes. The device also allows me to read and annotate PDFs in a comfortable way. Given that I use RMfuse to ‘mount’ the reMarkable cloud on my computer, I normally drag-n-drop the files I want to read in GNOME Files (formerly Nautilus, GNOME’s file manager) from their location on my computer to the mounted cloud.

This works really well so far. However, I also regularly receive files in the MS Office .docx format. Often I need to make substantial changes in these documents, which I do on my laptop or computer. But sometimes I only need to read them or only put my signature at the bottom. For these cases I would open the .docx file in LibreOffice, convert it to PDF and copy it to my reMarkable. In order to speed this up, I thought it would be nice to have some way where I right-click on a .docx file in GNOME Files/Nautilus and then convert it to PDF automatically, after which I can drag-n-drop the PDF file to the mounted reMarkable cloud.

So the question was: how can I add an item to the right-click menu of Nautilus, which runs a script when I click on it. After looking around on the internet, this turned out to be quite easy. It turns out that scripts placed in ~/.local/share/nautilus/scripts/ end up in the Nautilus right-click menu under the Scripts submenu.

To do the actual conversion to PDF, I created the following script:

#!/bin/bash
# This script converts the selected file to PDF using LibreOffice
# For general instructions on how to use Nautilus scripts, see
# https://help.ubuntu.com/community/NautilusScriptsHowto
#
# Save this script in ~/.local/share/nautilus/scripts/ and make it
# executable.

IFS_BAK=$IFS
IFS="
"

for SelectedFile in ${NAUTILUS_SCRIPT_SELECTED_FILE_PATHS}; do
    soffice \
        --nodefault \
        --nolockcheck \
        --nologo \
        --norestore \
        --nofirststartwizard \
        --convert-to pdf "${SelectedFile}"
done

IFS=$IFS_BAK

Because I wanted to be able to select multiple files, some having spaces in their names, I had to make sure the space character wasn’t used to split the NAUTILUS_SCRIPT_SELECTED_FILE_PATHS variable. That is why I temporarily replace the IFS variable with a newline.

I have only tried this on .docx files so far, but I guess it would work on presentations and spreadsheets as well.

Related Images:

Using the Lenovo Thunderbolt 3 Essential Dock with Linux

Today the Lenovo Thunderbolt 3 Essential dock I had ordered just before the new year arrived. My current laptop is a 6th Gen Lenovo Thinkpad X1 Carbon, which actually has two Tunderbolt 3 (TB3) ports. For a while the cable mess on my desk had been bothering me and a dock looked like a good way to get rid of both the clutter and the fact that I had to plug in a power cable, an HDMI cable, a USB cable and a network cable. The latter was especially tricky, because my laptop doesn’t have a dedicated ethernet port, but instead has a dongle that plugs into one of the TB3 ports. Of course, I didn’t want it to happen that I was on the road without the dongle, so double checking and making sure I had it in my bag was a regular worry.

With the TB3 Essential dock all this should be over. The dock is pretty well equipped:

  • 1 ethernet port (1Gbps)
  • 1 HDMI 2.0 port
  • 1 DisplayPort 1.4
  • 2 USB A 3.0 1.5Gbps ports
  • 2 USB C 10Gbps ports (no video support)
  • 1 3.5 mm audio jack.

The one thing that remained to be seen, of course, was whether the all those ports would work under Linux as well. I read some promising reports for other TB3-based docks from Lenovo, so I decided to order it.

After connecting the various cables to the dock came the moment supreme: I plugged in the TB3 cable to the laptop. And… The display connected to the HDMI port lit up. So far, so good! No USB functionality, however. Time to dive into the BIOS, because I remembered having seen some settings there, including some security related ones.

In the BIOS I couldn’t change the TB3 security setting because, as the help message explained, the graphics memory was set to 512MB. I’m not sure why this is an issue, but I looked up the graphics RAM setting and reduced it to 256MB. Next, I went back to the TB settings and set the security level to the first option: “No security”, followed by a reboot. Now, everything worked. That is one step in the right direction.

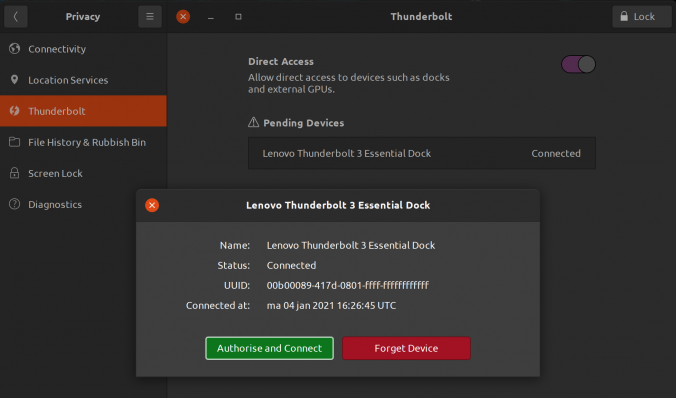
However, I wasn’t willing to forgo all security, so I went back to the BIOS settings and set the security level to “Secure Connection” (according to this blog post at dell.com this is security level 2 or SL2). I rebooted and indeed, no USB. So I went to Ubuntu’s Thunderbolt settings and there I had to press the ‘Unlock’ button in the top right corner, after which I could click on a button authorise the dock. After that all connections worked again. From the commandline, the boltctl utility can be used to see more information on the connected thunderbolt devices. This is the output for an unauthorised device:

$ boltctl list
? Lenovo Thunderbolt 3 Essential Dock
  ?? type:          peripheral
  ?? name:          Thunderbolt 3 Essential Dock
  ?? vendor:        Lenovo
  ?? uuid:          00b00089-417d-0801-ffff-ffffffffffff
  ?? status:        connected
  ?  ?? domain:     ca030000-0070-6f08-2382-4312b0238921
  ?  ?? authflags:  none
  ?? connected:     ma 04 jan 2021 16:26:45 UTC
  ?? stored:        ma 04 jan 2021 16:20:57 UTC
     ?? policy:     iommu
     ?? key:        no

And this is the output after clicking the “Authorise” button in the Ubuntu settings:

? boltctl list
? Lenovo Thunderbolt 3 Essential Dock
  ?? type:          peripheral
  ?? name:          Thunderbolt 3 Essential Dock
  ?? vendor:        Lenovo
  ?? uuid:          00b00089-417d-0801-ffff-ffffffffffff
  ?? status:        authorized
  ?  ?? domain:     ca030000-0070-6f08-2382-4312b0238921
  ?  ?? authflags:  none
  ?? authorized:    ma 04 jan 2021 16:30:07 UTC
  ?? connected:     ma 04 jan 2021 16:26:45 UTC
  ?? stored:        ma 04 jan 2021 16:20:57 UTC
     ?? policy:     iommu
     ?? key:        yes (new)

Nice!

However, my joy was shortlived, because after disconnecting and reconnecting the dock, the USB ports had stopped working again. The device had to be authorised again. This seemed tedious, so I set about reading more in the boltctl man page and found that there was a way to enroll a device permanently. So that is what I did. First I removed its UUID from the database:

$ boltctl forget 00b00089-417d-0801-ffff-ffffffffffff

And then added it again, this time with the auto policy:

$ boltctl enroll --policy auto 00b00089-417d-0801-ffff-ffffffffffff
 ? Lenovo Thunderbolt 3 Essential Dock
   ?? type:          peripheral
   ?? name:          Thunderbolt 3 Essential Dock
   ?? vendor:        Lenovo
   ?? uuid:          00b00089-417d-0801-ffff-ffffffffffff
   ?? dbus path:     /org/freedesktop/bolt/devices/00b00089_417d_0801_ffff_ffffffffffff
   ?? status:        authorized
   ?  ?? domain:     ca030000-0070-6f08-2382-4312b0238921
   ?  ?? parent:     ca030000-0070-6f08-2382-4312b0238921
   ?  ?? syspath:    /sys/devices/pci0000:00/0000:00:1d.0/0000:05:00.0/0000:06:00.0/0000:07:00.0/domain0/0-0/0-1
   ?  ?? authflags:  secure
   ?? authorized:    ma 04 jan 2021 22:33:08 UTC
   ?? connected:     ma 04 jan 2021 22:32:43 UTC
   ?? stored:        ma 04 jan 2021 16:20:57 UTC
      ?? policy:     auto
      ?? key:        yes

As you can see from the boltctl list output below, the policy is now set to auto (instead of the previous iommu):

$ boltctl list
 ? Lenovo Thunderbolt 3 Essential Dock
   ?? type:          peripheral
   ?? name:          Thunderbolt 3 Essential Dock
   ?? vendor:        Lenovo
   ?? uuid:          00b00089-417d-0801-ffff-ffffffffffff
   ?? status:        authorized
   ?  ?? domain:     ca030000-0070-6f08-2382-4312b0238921
   ?  ?? authflags:  secure
   ?? authorized:    ma 04 jan 2021 22:41:46 UTC
   ?? connected:     ma 04 jan 2021 22:41:45 UTC
   ?? stored:        ma 04 jan 2021 16:20:57 UTC
      ?? policy:     auto
      ?? key:        yes

Now I can disconnect and reconnect the dock without problems :-).

I also tested the 3.5mm audio port, which worked (at least for listening, I didn’t have a headset with microphone at hand). Same for the two USB A and the two USB C ports. Finally, I tested the DisplayPort and that worked too. In fact, connecting my 3440×1440 screen via both HDMI and DP to the dock worked fine. The Ubuntu display settings showed a “3 monitor” setup, two 3440×1440 screens and the latop’s own screen at 2560×1440.

So, in conclusion: the Lenovo Thunderbolt 3 Essential dock is fully supported under Ubuntu 20.04.

Thanks to this blog post at FunnelFiasco.com for pointing me to the boltctl utility!

Related Images:

Shucking hard drives

I recently bought several external hard drives. After looking around on the Internet a bit I settled for Seagate Expansion Desktop (v2) drives. I had read about these drives before and according to the internet the 10TB and larger drives have very interesting drives inside. In fact, I recently bought two 10TB versions of this drive, which contained Barracuda Pro drives (ST10000DM004). These drives are rated for 24hr/day usage, and spin at 7200 rpm so they work very well in a small NAS machine I use. At the time of writing these 10TB external drives cost around €193, whereas the bare internal drive itself costs around €290. Quite the difference! This is why people love so-called ‘shucking’: removing the drives from the enclosure and using them in e.g. their home NAS or home server.

For my annual offline backups I bough a Seagate Expansion Desktop (v2) 12TB (part nr. STEB12000400). For this drive things are even better: it contains an IronWolf Pro drive (ST12000NE008). These are true server drives rated for 24×7 use in servers of up to 24 drive bays. In fact, I use 8TB and 10TB IronWolf Pro’s in servers I use for work. Here the price difference is €210 for the external drive (a nice discount in a Dutch web shop recently) vs. €360 for the internal drive.

Of course, warranty can be an issue when shucking drives. I haven’t (yet?) had the need to return one of my shucked drives. I guess I’d have to put them back into the external enclosures. This would be possible, although I didn’t manage to remove the enclosures without damaging the little clamps that kept the lid attached to the rest of the case… But at these price differences I will take the risk (at least for personal use; professionally warranty without hassle may be worth the extra cost).

Related Images:

And… we’re back!

The title of this blog post refers to two things: first of all, it has been more than 4 years since my last post here. Incredible… Looking back, I think “too busy” is the main reason for this. Both work and private life have eaten up a lot of my ‘spare’ time. So, as many irregular bloggers do, I hereby declare that I will try to post more frequently :-).

The second reason why the title of this post is appropriate, is because the site has been down for several months (since April this year). This was because I made the stupid mistake of wanting to do too many things at the same time. Let me explain.

The webserver that served this blog was a KVM virtual machine running on my home server. The VM was running a version of Ubuntu that was EOL. Moreover, I wasn’t happy with the fact that I used the Ubuntu WordPress package, instead of using the official WordPress installation method. The main reason for my dissatisfaction came from the fact that by using the Ubuntu package I was depending on the Ubuntu packages to update the package. Which didn’t happen often enough to my liking. By using the official WordPress installation method you can configure WordPress to (semi-)automatically update itself. Much better from a security perspective.

I had already migrated my other KVM VMs to LXD containers, with those providing web servers now running behind an Apache reverse proxy setup. I wanted the same for this last remaining VM.

On top of that, the site wasn’t properly configured to use HTTPS (I think I had a self-signed certificate, but no automatic redirection of HTTP to HTTPS). Thanks to Let’s Encrypt there is no excuse for running a proper HTTPS server so users can browse your site without any eavesdropping.

So, one fine weekend in April I bit the bullet. But I bit off too much by doing it all at once: Install an Apache in a fresh LXD container, put it behind a reverse proxy, install the latest WordPress, restore the files from the old VM, all the while trying to implement an HTTP to HTTPS redirect.

Of course, that didn’t work out. The Debian/Ubuntu configuration of WordPress is different from just editing the default WordPress config file, instead Ubuntu has its own config file in /etc/, which is included in the one from WordPress. Also, it turns out that simply redirecting HTTP to HTTPS won’t work because I had ‘mixed content’ warnings all over the place. To fix those I had to do a search-replace of HTTP to the secure variant in the site’s database and to add some extra lines to the reverse proxy config (more details hopefully soon in a separate post). And then it turned out I had forgotten to enable Apache’s mod_rewrite in the LXC container… Before you know it, you loose sight of what you did, when and why. Which config file you changed, what you disabled, enabled, etc. Especially because all the digging, reading and fixing had to be spread across multiple evenings.

Nevertheless, it was a good learning experience :-). Don’t do this if you don’t have ample time for follow-up, do these kind of upgrades in steps and make a proper plan so that dependencies between the steps are clear and you have a functional setup between each step.

Looking back, the following would have been a much better battle plan then “let’s go, this shouldn’t be hard, the migrations of other VMs/services went fine”:

  • put the VM behind the reverse proxy
  • transition to Let’s Encrypt SSL certificates and set up HTTP to HTTPS redirection
  • Configure the container with the upgraded WordPress installation and migrate the data from the old VM.

There might have been some issues with outdated PHP versions in the old VM, but those could have been (probably) mitigated with some extra Ubuntu upgrades focusing only on keeping the web server alive or the use of a PPA with updated PHP package. All the while I could have at least kept the VM running (only disabling it during the times I actually worked on the upgrade). And, of course, I could have put a backup of the VM back while trying and documenting the upgrade path, but every time I nailed an issue, I expected it to be the last one.

Keep on learning!

Related Images:

Fixing Emacs tramp mode when using zsh

Today I finally took some time to fix a long-standing problem: when trying to edit a file on a remote host using Emacs tramp mode, long time-outs occurred when typing the remote file name (after hitting C-x C-f). These time-outs were so long and occurred after each key press that tramp was effectively useless.

After some digging (e.g. excluding helm as the problem source) I found this entry in the Emacs Wiki which basically told my that using zsh (the Z shell) on the remote host could be the culprit. Indeed, after adding

[[ $TERM == "dumb" ]] && unsetopt zle && PS1='$ ' && return

at the top of my ~/.zshrc file solved the problem instantly. What this line does is simply replacing the shell prompt with a very simple one (a $ followed by a space) if the terminal is of the dumb type (which is the case for tramp).

Related Images:

Installing parted during Ubuntu installation

When installing Ubuntu (I guess a regular Debian installation won’t be any different), I sometimes would like to manually create or change partitions (by jumping to another terminal, e.g. using Alt-F2) before doing the actual install. My preferred tool for that is parted, however, on regular Ubuntu installation images (at least the server variety), parted isn’t available from the console by default.

Today I noticed that (at least on today’s daily image of Ubuntu 16.04 Xenial), a udeb file for parted is available. This is how you install it:

udpkg -i /cdrom/pool/main/p/parted/parted-udeb_3.2-15_amd64.udeb

after which you can use parted to your heart’s content.

For more information on udebs see the Debian Installer Internals documentation.

Related Images:

Setting the console font when using an nVidia card

Even though I do most of the work I do on my workstation in a graphical desktop environment, I sometimes want or need to switch to one of the virtual terminals (consoles), for example when trying to fix a connection problem or hanging desktop environment.

Whenever I had to do this I was always bothered by the fact that the font was so large (or, the other way around, the resolution so low). What made my annoyance worse was that I knew from my early Linux days So, instead of being annoyed I decided to fix this. Thanks to the help of mchid on unix.stackexchange.com I solved in a matter of minutes. The tricky part for me was to realise I am using an nVidia graphics card, which means things are just a little bit different than normally.

Just in case StackExchange ever goes down or this answer gets lost I will reproduce it below.

For newer Debian & Ubuntu distros using nvidia, I had to do the following: First, edit /etc/default/grub. Change the following line:

#GRUB_GFXMODE=640x480

to this:

GRUB_GFXMODE=1920x1200
GRUB_GFXPAYLOAD_LINUX=keep

replacing 1280×800 with the desired resolution.

Then:

echo "echo FRAMEBUFFER=y" | sudo tee /etc/initramfs-tools/conf.d/splash
sudo update-initramfs -u
sudo update-grub

To simply change the font size, you can do so using the following command:

sudo dpkg-reconfigure console-setup

Related Images:

« Older posts Newer posts »

© 2025 Lennart's weblog

Theme by Anders NorénUp ↑